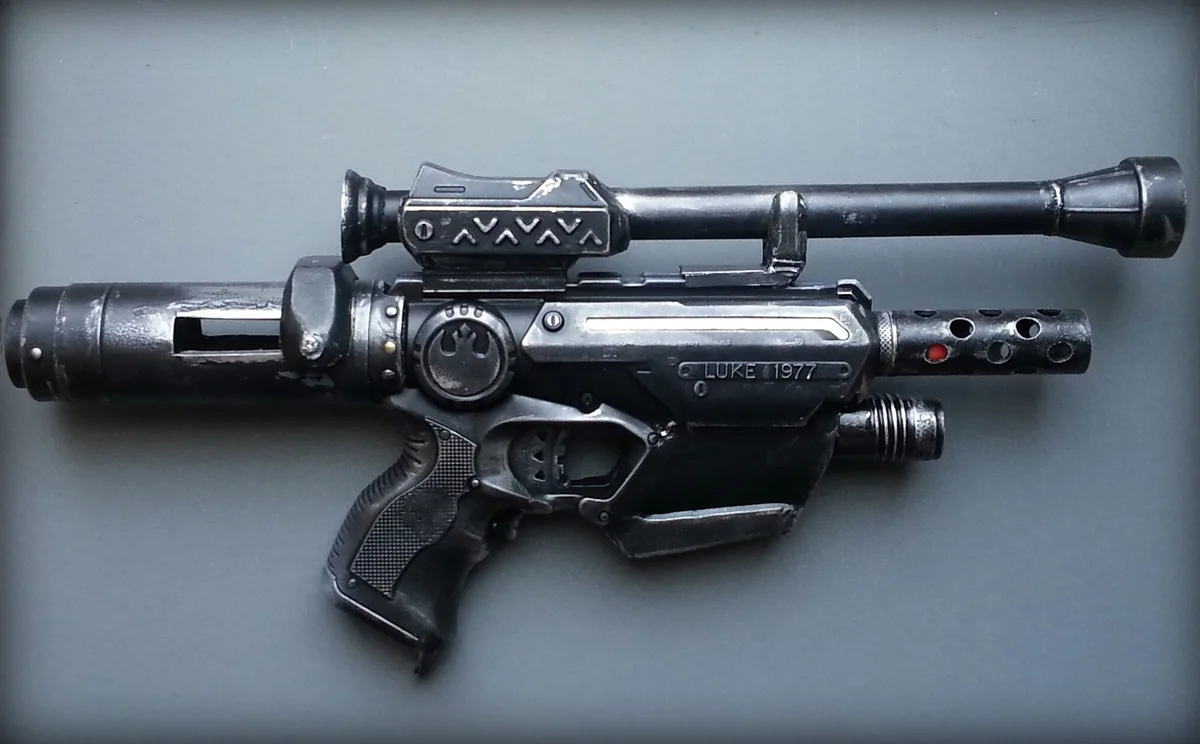
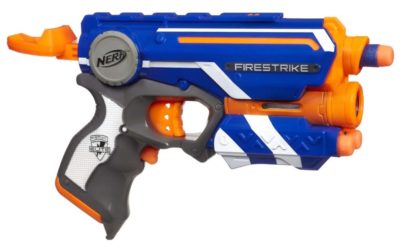
Nerf gun mods fall into 6 jobs, and 2 of them are worth more than the other 4 put together. A stock blaster throws a dart 15 to 35 feet. Here is the order to do the mods in, what each one is actually worth, and the mistakes that cost people a blaster.
The 6 mods, and what each one gives you
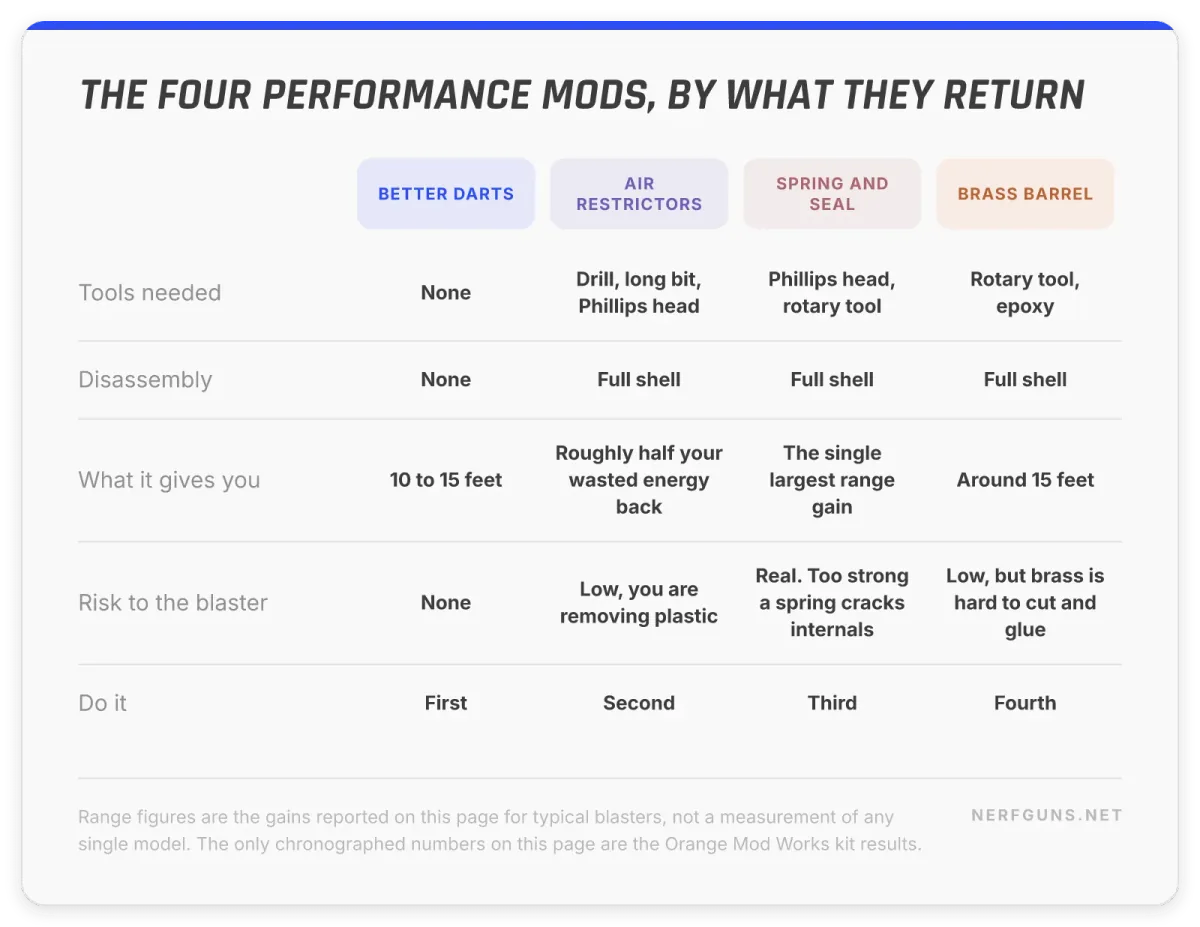
All Nerf gun mods come down to these 6. They are listed in the order of what they return, not the order you should attempt them.
- A stronger spring. This alone adds the most range of any of the mods here.
- Remove the air restrictors. Every blaster has them, and they throw away roughly half your energy.
- Better darts. No tools at all, and worth 10 to 15 feet on most blasters.
- A better barrel. CPVC, PETG or brass. Brass can add 15 feet on its own.
- Paint and finish. The only one of the mods nobody can measure and everybody notices.
- Higher voltage. Flywheel blasters only, and the most likely of the mods to end in a melted shell.
As an Amazon Associate and eBay Partner, we earn from qualifying purchases. Some links on this page are affiliate links to Amazon. They cost you nothing extra and they are what keeps this workbench stocked. See our affiliate disclosure.
Why bother with Nerf gun mods at all
Two reasons, and they pull in different directions. Both are worth understanding before you spend money on parts, because the mods that serve one do not always serve the other.
Range. Think about the blaster you own. It probably throws a dart somewhere between 15 and 35 feet. Doubling that is not unheard of, and modders have taken blasters well past 100 feet.
Rate of fire. A stock automatic clears 25 rounds in about 7 or 8 seconds. Voltage mods cut that to around 3.
Here is the thing nobody says out loud. Nerf tones these down on purpose, and every one of the mods on this page is you deliberately undoing that. That is fine, and it is also the reason the safety section below is not filler.
There is a third reason worth naming: modded blasters sell. A well-executed custom piece runs well past $100 on the aftermarket, so the hobby can pay for itself.
Start here: the beginner’s path through the mods
If you are new, the write-ups people post online look complicated, and some of the in-depth mods genuinely are. The mods below are ordered so that nothing assumes a skill you have not already used.
But blasters get modded so often for a reason: they come apart and go back together far more easily than airsoft or paintball guns, and they cost a fraction as much. Break one learning and it is a cheap lesson.
Work in this order. Each step costs more time than the one before it, and each teaches you something the next one needs.
- Better darts first. No tools, no disassembly, 10 to 15 feet.
- Open the shell and pull the air restrictors. One drill bit, one Phillips head. This is the mod that teaches you how your blaster actually works.
- Improve the seal, then the spring. An O-ring costs pennies and it is the safest power gain in the hobby.
- Then the barrel. Now you are cutting and gluing, and the payoff is another 15 feet.
- Paint and finish last, once the internals are done and you are not going to open it again.
Not sure which blaster to open first? Our guide to the 3 best Nerf guns to mod covers the starter shells that forgive a mistake, and why a spring pistol teaches more than a motorized blaster.
Spring gun or pump gun? Check before you start
There are 2 broad types, and you can tell which you have by how you prime it. Pump a few times and it is a pump gun. A trigger plus a cocking mechanism means a spring gun.
They get modded differently, so know which is on your bench before you order parts.
Which blaster should you cut into first?
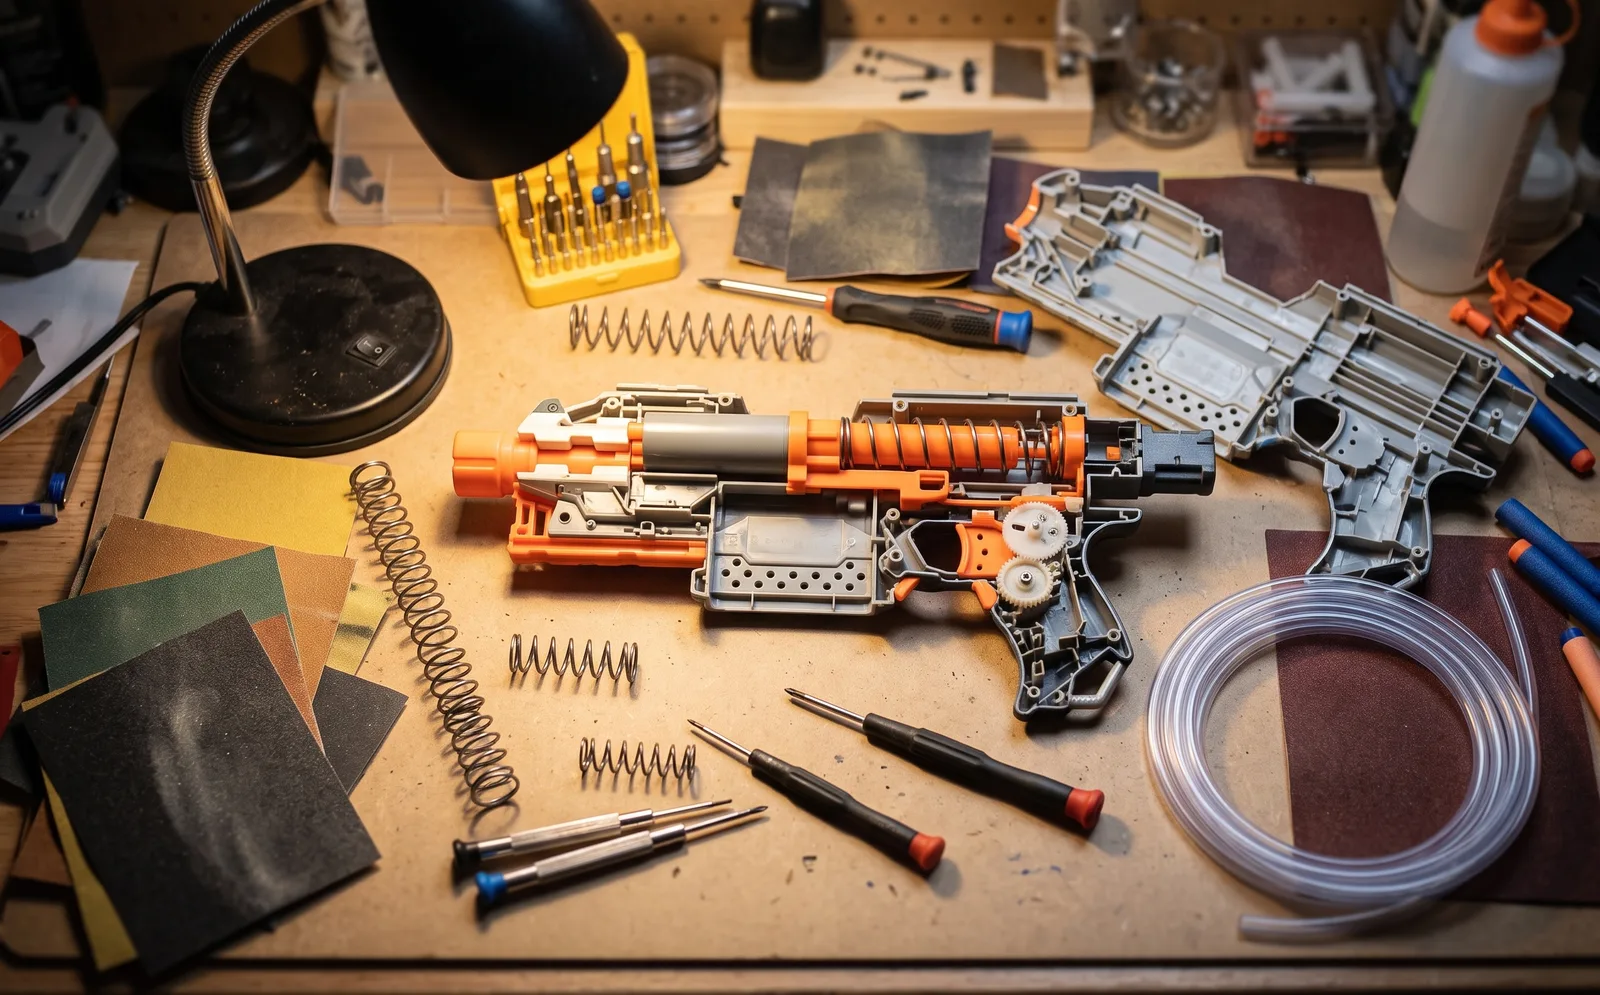 Skill is relative and it depends on the mod. A paint job on a Vulcan is technically one of the mods on this page; altering that same blaster’s internals is a different afternoon entirely.
These 4 are the classic step-up blasters for an intermediate modder.
- The FuryFire. Essentially a bigger Maverick. Single fire, reverse plunger, large capacity, with a better plunger seal that buys a little accuracy and range. Hidden screws and fragile parts make it a coin flip against the Maverick on difficulty. Re-released in 2012.
- The Recon. Notorious for being harder than it looks. Its air restrictor cannot simply be removed, it has to be drilled out, and a breech mod means destroying stock parts. Around $20, which makes it a cheap way to try technical work.
- The Deploy. A Recon that transforms and pumps, with the same tricky reputation. Flimsy, needs a drill, and hard to open because of the transforming design. Plenty of modders hot glue theirs permanently into blaster mode.
- The Longshot. The sci-fi and military crowd’s favourite, and it runs intermediate to advanced purely on the challenge of fitting its internals back together. It is hard to find and often goes past $100, so do not learn on one.
Buying a second blaster purely to take apart is a smart move, and you do not have to pay retail. Amazon third-party listings are a goldmine for cheap blasters, including discontinued ones. An expensive blaster is not automatically a better base.
Mod 1: a stronger spring
This is where the range lives, and of all the mods on this page it is the one everyone eventually does.
Spring blasters all use a plunger and spring to compress air behind the dart. A stronger spring compresses that air faster, which means more force behind the dart.
Doing it
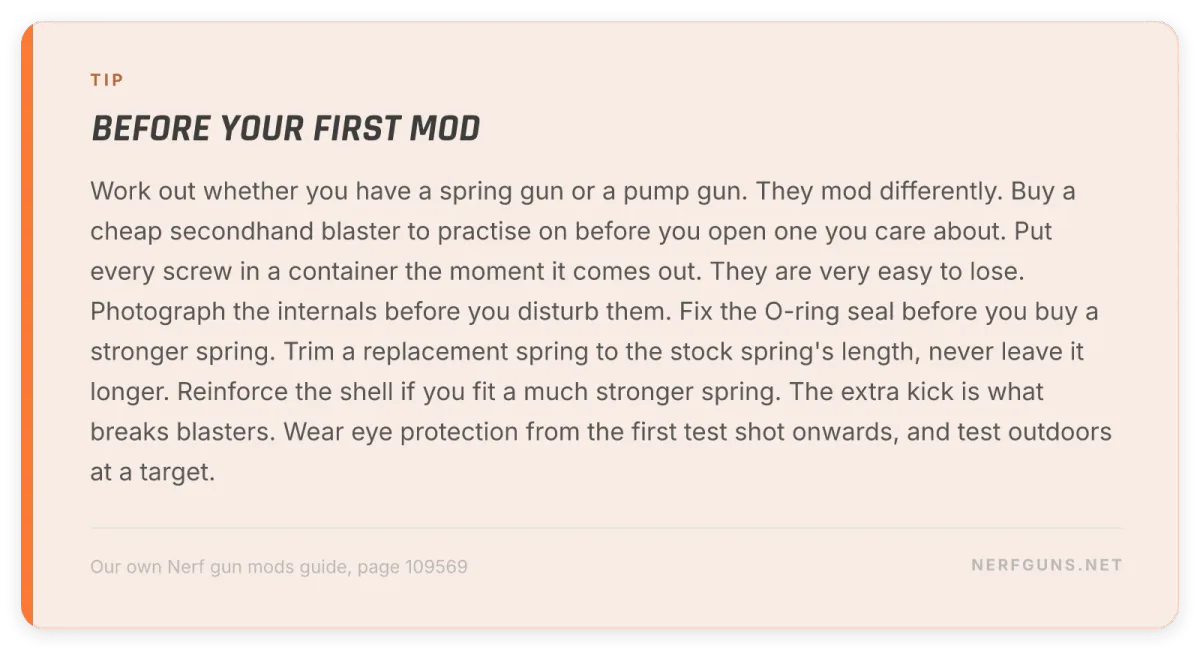
Unscrew the shell and put the screws in a container immediately, because they are very easy to lose. Separate the halves. The spring sits inside the pulling system; on a CS-6 it is in the middle.
Trim the new spring to the same length as the stock one with a rotary tool and a cutting wheel, or bolt cutters. Then unscrew the plunger head and swap them.
You may need to reinforce the shell with PVC afterwards, because the extra kick is exactly what makes a blaster come apart in your hands.
The mistake people make
Do not fit a spring that is too strong. The failure modes are a detaching barrel and cracked internal plastic, and both happen without warning.
Stacking a second spring or stretching the stock one both work briefly and then break. They are far worse ideas than simply buying the right spring. Upgrade springs are easy to find, and Orange Mod Works carry a large selection.
Improve the seal before you improve the spring
Most spring blasters seal against the plunger tube with an O-ring, and that ring is rarely airtight. Tightening the seal is the cheapest range gain in the whole hobby, and of all the mods here it is the one most people skip.
- Replace the stock O-ring with one that seals better.
- Or add a second O-ring beside the first on the plunger head.
- Or lay a thin layer of slick electrical tape into the O-ring slot before fitting the ring, which makes the seal slightly larger.
Whichever you pick, do not build it up too thick. The plunger still has to slide smoothly through the tube.
Want to know what the change is worth before you buy parts? Run the numbers in our Nerf kinetic energy calculator and the joules to FPS calculator.
Mod 2: remove the air restrictors
Air restrictors are pieces of plastic that take roughly half the energy you put into a shot and throw it away. Of all the Nerf gun mods here, removing them is the highest-value hour you will spend.
You need a drill, a long bit and a Phillips head. Unscrew the shell, remembering where every screw goes.
On a CS-6, once the trigger is out, there is a blocked space inside a tube that looks like a turret. The opposite side carries a needle pointing about two thirds of the way out. Drill out the needle and the air moves freely. Then reassemble.
Every blaster puts its restrictor somewhere slightly different, though it is usually obvious once the shell is open. For a worked example with before and after photos, the Zombie Strike Hammershot teardown at nerfscience.blogspot.com shows it clearly.
Mod 3: better darts and homemade Stefans
The only one of the mods on this page that needs no tools and no disassembly, and it is worth 10 to 15 feet.
Start by simply feeding better ammunition. Our dart refill guide covers which official darts fly straightest and why counterfeit foam wrecks a blaster.
Before you buy foam, check what you already own. Reshaping worn Nerf darts recovers most of a tired tin in about 10 minutes and costs nothing but a pot of water.
Making Stefans
A homemade dart is usually 1/2 inch foam backer rod. A 20 foot bag from a hardware store yields about 75 darts.
- Cut the rod to dart length.
- Straighten them with a hair dryer and a pillowcase. Run the dryer 1 to 2 minutes, shake the case, let them cool.
- Carve a hole in the centre of each tip.
- Drop a BB in and glue over it to fill the hole.
About 30 minutes gets you 75. For keeping them flying straight afterwards, see how to keep a modded blaster running.
Mod 4: the barrel
Barrel mods exist for one reason, and it is a plumbing problem rather than a power one: the stock barrel on most blasters, including N-Strike blasters, is considerably wider than the dart, so air escapes around it instead of pushing it.
Bring the barrel’s inner diameter closer to the dart’s outer diameter and pressure builds behind the dart instead of leaking past it.
The fit test that decides everything
Too loose and you lose pressure. Too tight and you lose speed to friction. You want a dart that slides in without twisting or wedging.
- Hold the barrel vertically.
- Insert a dart. If it falls straight through, the barrel is too big.
- If it sits, blow a short burst of air in. If it pops out, you have a winner.
CPVC, PETG and brass
 CPVC is chlorinated polyvinyl chloride, and all you need to know is that it is cheap, easy to cut, easy to glue, and comes in sizes that fit a dart. CPVC and the tools to cut it are widely available.
 Brass is the performance answer, because it polishes to a finer tolerance than plastic, which means less friction on the dart. 17/32 is the size, and it fits streamline darts.
The drawbacks are real: brass costs more, epoxy does not bond to it as well, and it is tougher to cut. Polished 17/32 brass tubing is the thing to search for.
 PETG is the compromise. It is clear, which looks good, it is easier to cut and glue than brass, and it is light enough for a blaster with an auto-rotating barrel. PETG tubing is cheap to try.
So which should you use?
Brass, if you are asking me. It can add 15 feet to a stock blaster on its own, and stacked with the other mods on this page you can comfortably double that.
- On a budget: CPVC.
- For performance: 17/32 brass.
- For light weight or a clear look: PETG.
Mod 5: paint and finish
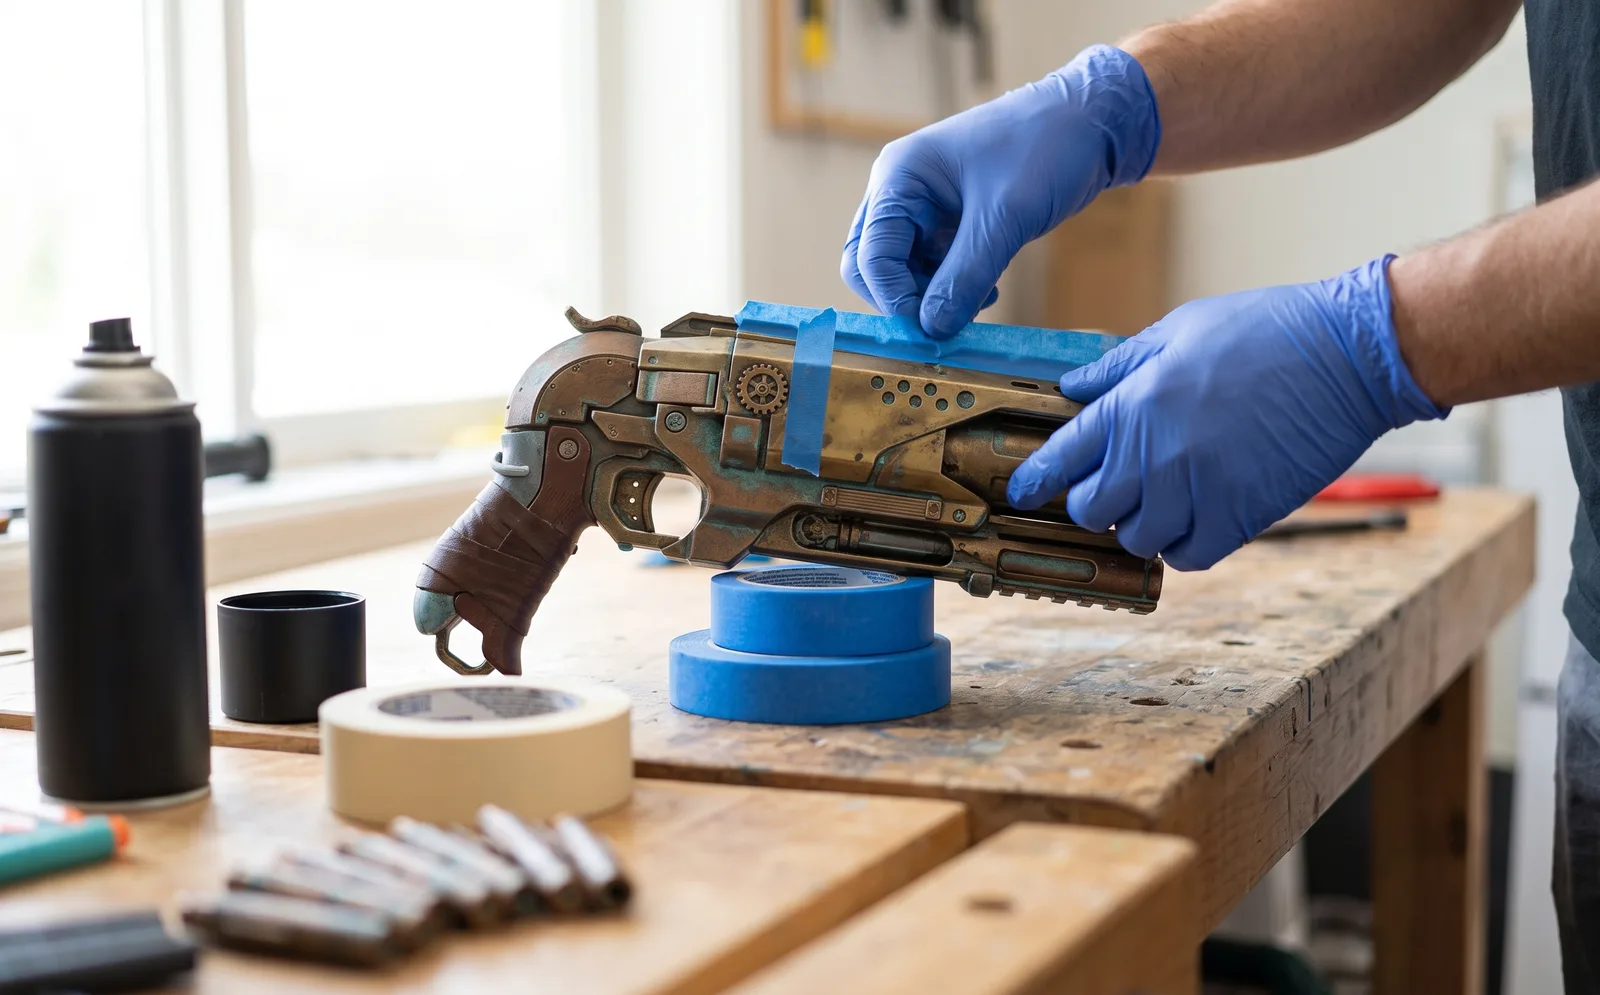 Paint is the least measurable of the mods and the most noticed. Straight from the box a blaster is obviously a plastic toy, and neon orange does not help.
Disassembling
You can paint without taking a blaster apart, but it is harder and the result is worse. Complex parts do not mask well while assembled.
Do not just pull the screws and lay it out in a hundred pieces. Open the top carefully, keep springs and screws in labelled bags, and photograph how the internals sit before you disturb them.
Sanding
By hand or with a rotary tool. It is tedious, and it is what gives paint the surface to bond to. Sand until the plastic feels rough. Low grit if you are worried about deep scratches the paint will not cover.
Taping
Mask whatever should keep its original colour, or the edges of a striped design. Blue painter’s tape is the right tape, because duct tape and masking tape both leave residue on a shell.
Painting
Blaster plastic is slick, so you need spray paint made for plastics. Krylon Fusion is the brand modders name most often for bonding well and lasting.
Lay black down first, whatever your colours. That way a scratch shows black instead of the original neon. If you are new, paint the outside panels only, because it is easy to clog internals.
Seal each panel before you reassemble. The full step-by-step with prep, base coat, accent coats and clear coat is in our paint a Nerf gun guide, and if spraying is not your thing, hydro dipping gets a pattern no brush can.
Mod 6: higher voltage
The last of the 6 mods, and by a distance the hardest of the mods on this page. It applies only to battery-powered blasters, and it takes real wiring experience.
The principle is simple: fit a larger battery pack, the kind used in remote control cars and boats, and the motors spin faster. Rates of fire up to around 500 rounds per minute are reachable.
People have melted blasters doing this, and that is not a figure of speech. Size the pack before you solder anything: our LiPo battery calculator works out cell count and voltage for a given blaster, and the battery runtime calculator tells you how long that pack lasts on the field.
Before you buy a pack, read the LiPo safety checklist. It is the shortest useful thing on this site.
Motors, wiring and the switch that burns out
Higher voltage is only the first half of flywheel mods. The second half is everything the extra current has to travel through, and skipping it is the most common way people cook a blaster they were trying to improve.
Motors
Motor mods start here. Stock flywheel motors are chosen to be cheap and safe on alkaline batteries. Swapping them for higher-performance motors changes both the speed the wheels reach and how fast they get there, and spin-up time is what you actually feel in a firefight.
Match the motor to the pack. A motor rated for the voltage you are feeding it lasts. One that is not runs hot, and heat is what kills flywheel blasters.
Wiring
Wiring is the least glamorous of the flywheel mods. Stock wiring is thin because stock current is low. Push a LiPo through it and the wire itself becomes a bottleneck, warming up and dropping voltage before it reaches the motors. Replacing the runs with thicker wire is unglamorous and it is the cheapest performance in this whole section.
The trigger switch, which is the part that actually fails
Here is the bit most mods guides skip. The stock trigger switch is a small contact never designed to carry the current a LiPo delivers. Under that load the contacts arc, pit, and eventually weld or fail open. Symptoms are a blaster that fires intermittently, then not at all.
The fix is either a switch rated for the current or a MOSFET, which lets the small stock switch trigger a component that carries the load instead of carrying it itself. If you fit a LiPo and change nothing else, this is the part that will fail first.
Before you buy a pack, our LiPo battery calculator sizes it, and the LiPo safety checklist covers charging and storage. Neither is optional reading.
Mod kits: the shortcut for all of it
Spring swaps and restrictor removal are the 2 most popular mods because they return the most range of any of the mods here, and both got easier once mod kits arrived. Everything comes in one box and the only step left is installation. See which kits fit which blasters.
What makes these kits different
The people at Orange Mod Works sent me a couple of complimentary upgrade kits to test. In 2020 this site put 2 of them through a full before and after on 4 blasters. Our figures are further down.
Here is the problem the kits solve. Modders have always dropped high-tension springs into blasters for distance, seen the range jump, and watched the blaster shatter a fortnight later. Most people have no way to hone stronger internals that can take a stronger spring. These kits are that: metal and polycarbonate parts replacing brittle stock ones.
The Results, Measured on a Chronograph
I was excited to give them a go. The figures below are NerfGuns.net’s own, drawn from our Orange Mod Works kit work in 2020, and published as ranges rather than single numbers on purpose.
Why a range and never an exact number. Foam dart velocity is not a fixed property of a blaster. It moves with air temperature, with wind, with how worn the spring is, with how cleanly the shell went back together, and with the individual dart. Anyone quoting a figure to the decimal is quoting one shot on one day in one room. A range is the honest unit for this, and it is what we publish everywhere on this site.
These describe those 4 blasters with those kits fitted. Treat them as what the kits are capable of returning, not as a promise about yours.
- Longstrike: 45 to 52 FPS before, 70 to 75 FPS after the Unleashed Stage 1 kit. It feels like a sniper rifle afterwards, with no misfires or cocking issues.
- Alpha Trooper: 43 to 52 FPS before, 60 to 65 FPS with Stage 1. It sometimes will not cock, and it misfires.
- Raider: 40 to 47 FPS before, 50 to 55 FPS after Stage 1. No misfires, but the pump arm had to be held fully back to guarantee the bolt caught.
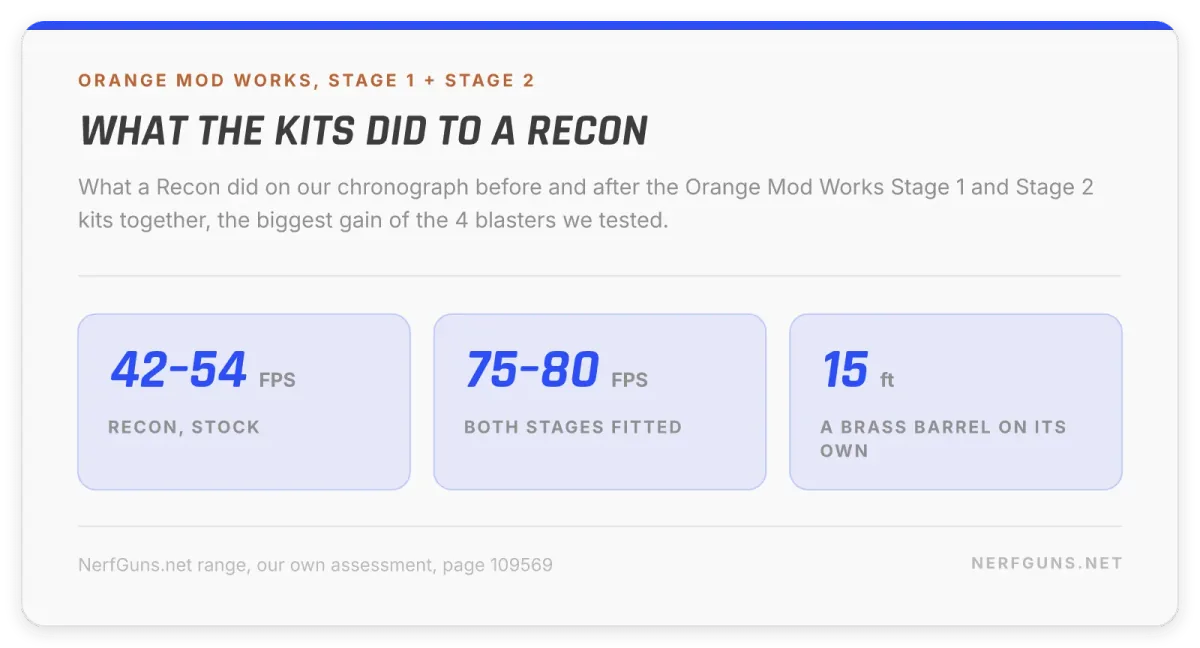
- Recon: 42 to 54 FPS before, 75 to 80 FPS with Stage 1 and Stage 2 together. The biggest gain and the fewest problems.
One conclusion matters more than the numbers. The Recon did best because it had both stages. Stage 1 brings the main and sear springs plus a metal trigger catch. Stage 2 brings an improved bolt and plunger.
Fit Stage 1 alone and you have overpowered weak plastic with a stronger spring and trigger catch, which is exactly what causes the misfires and hard cocking on the other 3. Stage 2 is not optional, it is the half that makes Stage 1 safe.
Installation can be tricky
Still from that same 2020 test. The Alpha Trooper was by far the hardest to put back together, with halves that would not meet and pieces that shot out during alignment. What eventually worked was assembling it cocked.
The Longstrike and the Recon were the easiest of the 4 by a wide margin.
The tools worth owning
You do not need a shop. You need a Phillips head screwdriver, a drill with a long bit, a hot glue gun, painter’s tape, sandpaper and a rotary tool.
A rotary tool covers sanding, spring trimming and barrel cutting by itself, which is why it appears in nearly every one of the mods on this page. The full bench list is in the modder’s toolkit checklist.
For everything that bolts on rather than gets cut in, see our barrels, stocks and scopes guide.
The factory caught up: Loadout and swappable parts
Something changed in 2025 that is worth a modder’s attention.
Nerf launched Loadout, a line built around attachments that hot-swap between blasters. Hasbro claims over 1,000 combinations. Treat the number as marketing, but the idea is not: for the first time, the factory is selling the thing modders have been doing with a screwdriver for 15 years.
What that does and does not change for you.
- It does not replace real mods. Swapping a factory barrel is not a spring swap. Nothing in a Loadout box changes what mod 1 or mod 2 on this page gives you.
- It does change the starting point. A blaster designed to come apart is a friendlier base than one designed to be glued shut.
- It changes what a beginner should buy first. If you want to learn how parts affect handling before you open anything up, this is a cheaper and less permanent way to find out.
The Loadout Shadowspeed Recon is the clearest example of the idea, and the Loadout Galactic Commander is the motorized one if you want to get at a flywheel setup later. Both fire N1 darts, and Amazon’s own listings say N1 darts fit only N Series blasters, so your existing dart pile will not feed them.
One honest caveat: these are new enough that the community teardowns are thin. If you want a base with 15 years of documented mods behind it, the section below is still the better answer.
Which blaster should you actually mod
This is the most common question about Nerf gun mods and it usually gets answered on looks. Looks are the wrong criterion. What decides whether a blaster is worth the mods is what is inside it and whether the shell survives being opened.
Three structural facts decide which mods a blaster will take:
- Plunger type. A direct plunger pushes air straight down the barrel and responds well to a stronger spring. A reverse plunger wastes some of that stroke, so the same spring returns less.
- Screws, not glue. A shell held together with screws opens and closes as many times as you like. A glued or ultrasonically welded shell is a one-way trip.
- Spring or flywheel. A springer is mechanical and needs no electronics. A flywheel blaster means motors, wiring and a battery, which is a different and larger job.
| Blaster |
System |
Why modders pick it |
Difficulty |
| Maverick REV-6 |
Spring, reverse plunger |
Cheap, everywhere, opens easily, the classic first mods platform |
Beginner |
| Nite Finder EX-3 |
Spring, direct plunger |
Simplest internals on this list, a genuine teaching blaster |
Beginner |
| Elite Retaliator |
Spring, direct plunger |
Clip fed, modular, the platform most mods guides assume |
Beginner to intermediate |
| Elite Strongarm |
Spring, direct plunger |
Slam fire and a rotating barrel, cheap enough to risk |
Intermediate |
| Elite Stryfe |
Flywheel |
The default flywheel platform for motor and battery work |
Intermediate |
| Longshot CS-6 |
Spring, direct plunger |
Huge internal room, the classic advanced project |
Advanced |
If you want one answer for your first mods: start on a Nite Finder or a Maverick, because the cost of ruining one is small and the internals are simple enough to understand in an afternoon. Move to a Retaliator once you have opened something and put it back together working.
The advanced end of this question stops being about Hasbro shells entirely. Once you want parts built for the spring rather than surviving it, you are looking at 3D printed blasters.
Safety once the mods are in
Every one of the 6 mods above makes a toy hit harder. That is the point, and it is also the reason this section exists.
- Eye protection, always, once a blaster is modded. Stock ranges are safe by design. Modded ones are not covered by that design.
- Know your game’s limit before you turn up. Organised games cap muzzle energy or velocity, not range, and a modded blaster that fails a chrono check does not play.
- Never point a modded blaster at a face, including your own while you are testing it.
- Test outdoors, at a target, at distance. The first shot after a spring swap is the one that tells you whether the shell holds.
- Stop if the shell flexes. Cracked plastic under a stronger spring is how a blaster comes apart in your hands.
None of that is a reason not to mod. It is the difference between a hobby and an accident.
When modding runs out of road: 3D printed blasters
All 6 mods on this page are limited by the same thing: you are improving a shell that was designed around a weaker spring. At some point the honest answer is not a better mod, it is a better shell.
That is what the printed scene is. Designers publish files, you print the shell and internals on a desktop 3D printer, and you assemble them with springs and steel you buy separately. Most designs feed standard Nerf magazines, so your existing darts and clips carry over.
The design that made this mainstream is the Caliburn, a mag-fed pump-action springer released into the public domain by Captain Slug. Free to download, free to remix, and documented well enough to be a realistic first build.
Should you jump straight to it? Probably not. Mods are faster, cheaper and reversible, and it teaches you what a plunger and a spring actually do. Printing is the step after that, and it is a project rather than an afternoon.
The full guide is here: 3D printed blasters, how the foam scene builds its own. It covers the designs worth knowing, the printer and hardware you need, the safety and fps rules that apply, and where the community lives.
Paint mods worth copying
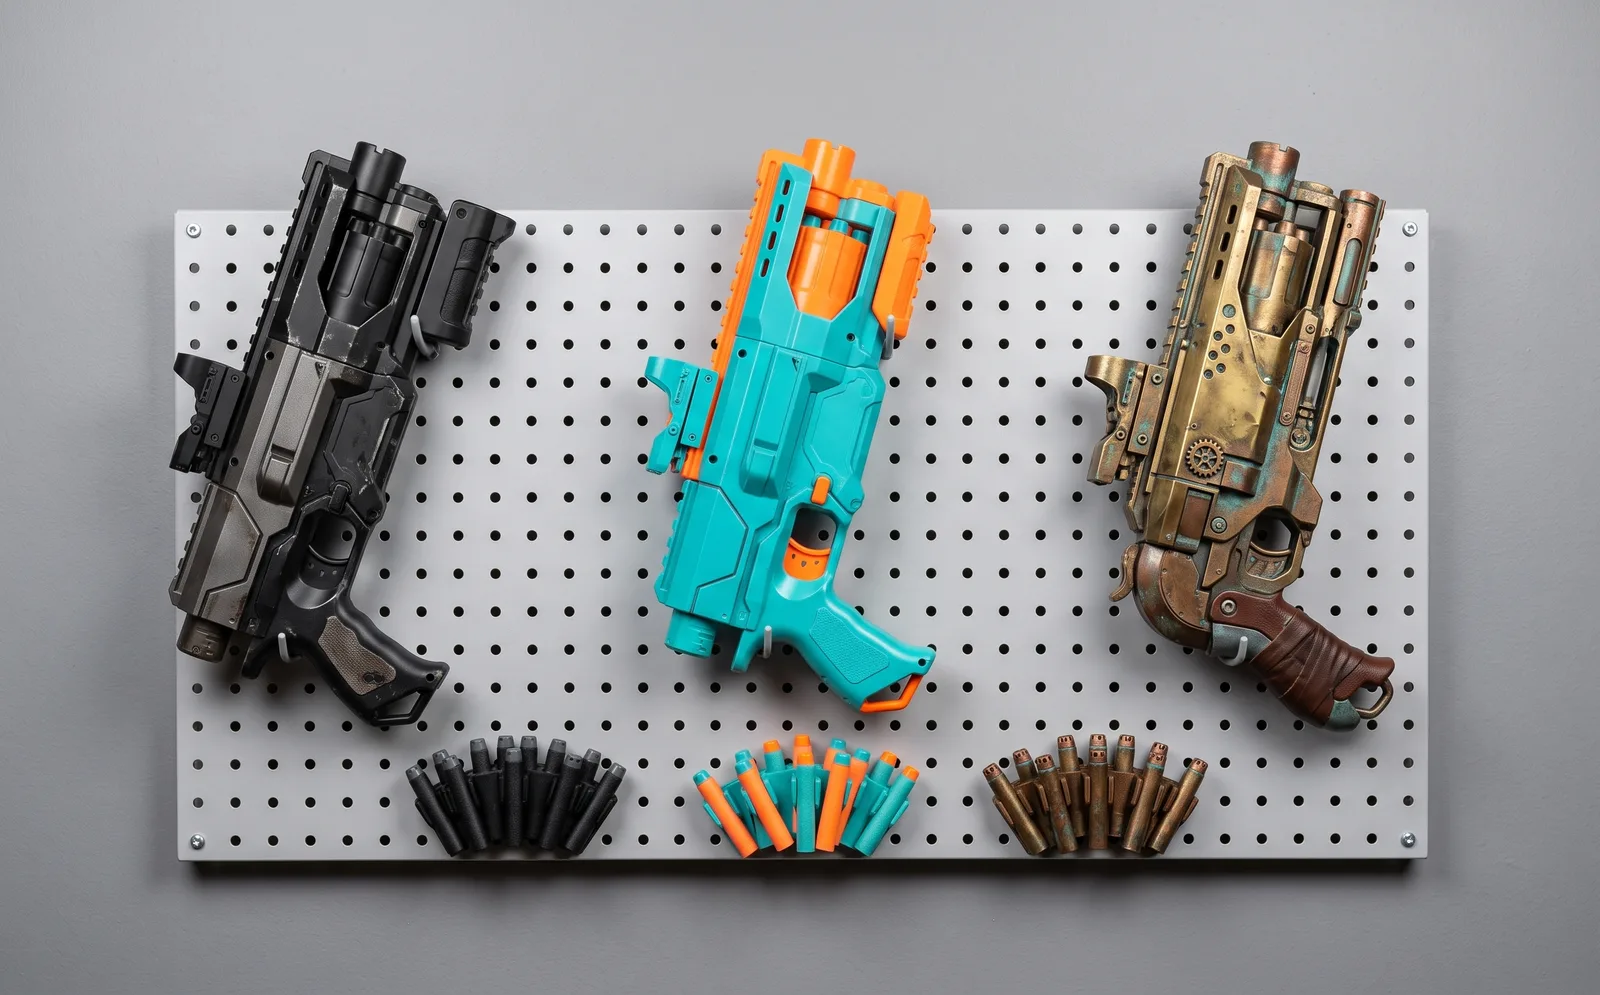 Performance is half the hobby. The other half is making a blaster look like it came from somewhere else. These are community paint mods worth studying.
Mass Effect
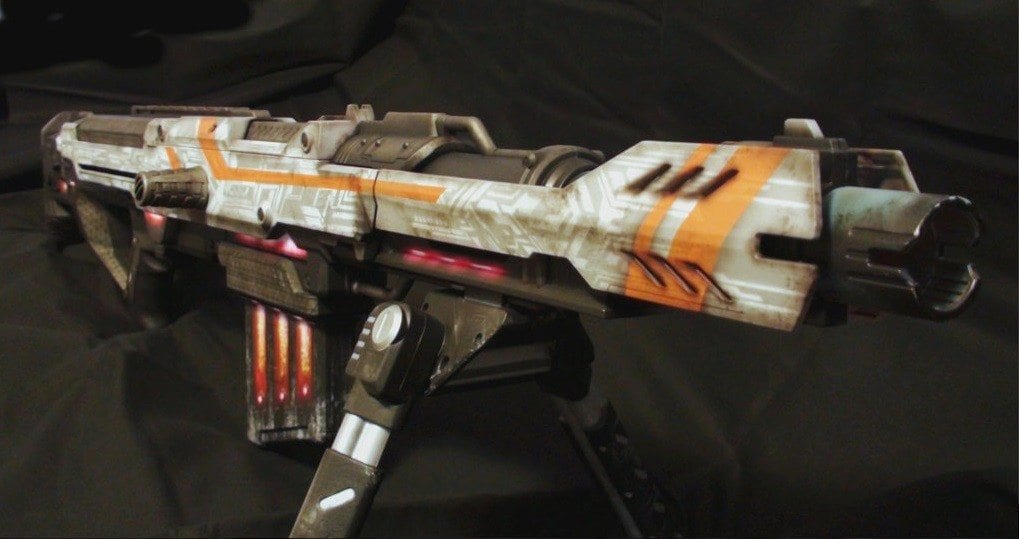
- Nerf Proton by Ron Scott of SteampunkWasteland. The clearest demonstration of what paint alone does. A green and orange toy becomes a sci-fi piece with an N7 logo and black, white and grey paint.
- Nerf Centurion by Atropos907. Airbrushed, evoking Mass Effect and District 9 at once. The two-tone blending and the glow down the magazine are the parts to study.
- M-92 Mantis from a Raider, by RebelATS. Still functional, with an extended barrel and a stock built up in modelling clay. 20+ hours, and it nearly matches the in-game weapon.
- Nerf Stampede by Johnson Arms. Red and black N7. Flawless paint and detailing, and the contrast is what makes the logo land.
- M8A from a Praxis, by Nerfenstein. Grey and black with detail work that sells metal plating. The magazine is transparent sheeting over an LED that cycles colours for a heat exchange effect.
Borderlands
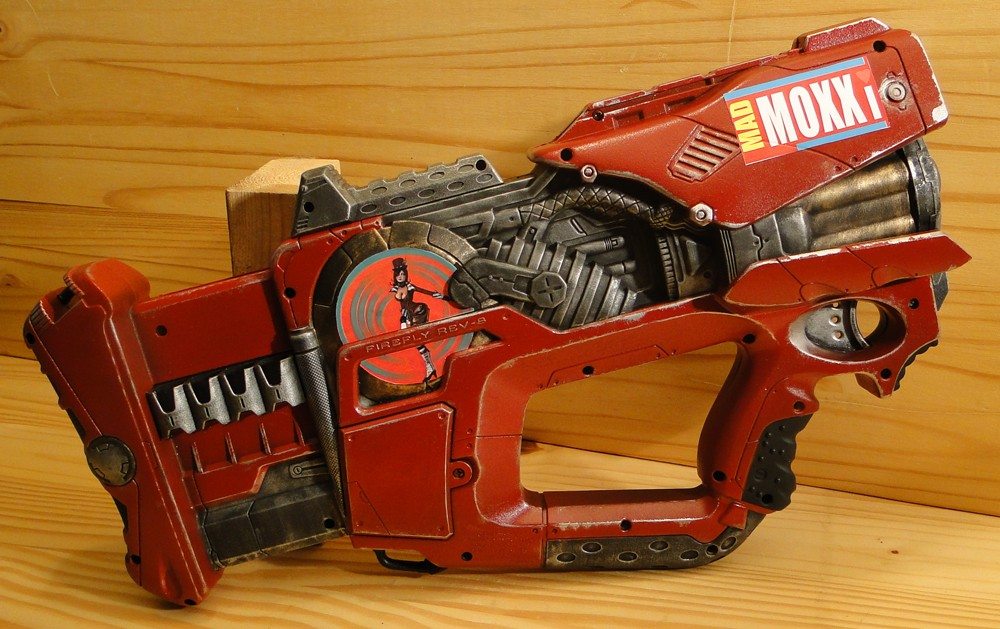
- Maverick and Longstrike by DrBeakerMD. Part of a 4-gun set. The rugged, dirty detailing comes from careful coats and a dry brush technique.
- Torque pistol from a Maverick, by Hypercats. Green, with custom printed stripes and logo that fit the shape rather than fight it. The weathering and rust detail sell the battle-worn look.
- Mad Moxxi SMG from a Firefly, also Hypercats. The decals could be cleaner, but the inner paintwork and the bronze and steel against the red are excellent.
- Bandit pistol from an Alpha Trooper, by Johnson Arms. The shark-mouth barrel and the subtle scratches above the magazine are what catch the eye.
- DAHL Attack Scorpio, also Johnson Arms. Yellow and black, crisp camo, and very close to the in-game weapon.
Steampunk
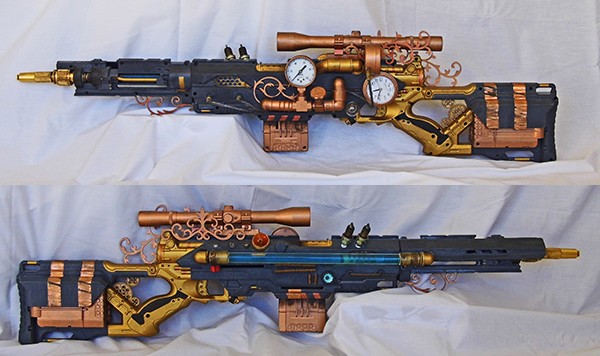 Of all the modding subcultures, the steampunk crowd took to Nerf hardest. A plastic toy is about as far from polished brass and clockwork as it gets, which is exactly why the transformation is satisfying.
- Nite Finder EX-3 by Cation Designs. Black smudging that reads as weathered wood, and antique gold-crystal buttons covering the Nerf logo instead of sanding it away.
- Barrel Break IX-2 by BeesBizarreBazaar. Metallic paint and lacquer, with leather cording round the grip for a rustic edge.
- Longstrike CS-6 by vanbangerburger. Piping, steam gauges and trellis pieces over mostly original colour. Proof that add-ons plus paint go a long way.
- Maverick REV-6 by oldjunkyardboutique. Steampunk, cyberpunk and gothic at once, with tubing, hose clamps and a skull detail over silver.
- Vulcan EBF-25 by Professor T. Lemetry. Named the Goliathon. Copper tubing and gauges, and metal serial numbers along the side that complete the locomotive look.
- Longstrike CS-6 by Thomas Schmidt. A scope and a weathered bronze and rust scheme, nothing more. Proof that steampunk mods do not need heavy surgery.
How to steampunk your own blaster
- Colour first. Silver, gold and especially bronze change the whole feeling. A rust-coloured finish rubbed in creates age, and the right texture work makes plastic read as wood.
- Add pipes and fittings. Hardware stores carry copper and PVC in every size and angle. Copper costs more, so paint PVC if you are on a budget.
- Raid the doodad aisle. Buttons, gears, hooks, tubing and sheeting all attach. A hose clamp fastens things to the body and a wall hook makes a trigger guard. For gauges and anything that lights up, check car accessories.
If you would rather buy a finished piece than build one, search Amazon for finished custom paint work in the same style; listings turn up there too.
The best base blasters for prop mods
If a costume is the goal, the base blaster matters more than its colour, because paint mods fix colour and no mods fix a shape. Pick by silhouette, then plan the mods around it.
Post-apocalyptic
The Doomlands line was designed around a post-apocalyptic 2169 and runs to 7 weapons.
- Lawbringer. Revolver style, up to 12 darts, 40 to 50 feet, hammer action so the rate is your finger. The orange repaints easily.
- Double Dealer. Crossbow shaped, fires 2 darts at once, holds 24. Repaints convincingly into a real crossbow.
- Vagabond. Very large, single shot, up to 6 darts, and it becomes the Borderlands vagabond with the right scheme.
Zombie Strike runs to 28 products with no single colour scheme, and the melee props in it are the reason it appears here.
- Brainsaw. A blaster with a chainsaw on the end, 8 darts, one rail. The base for any Evil Dead build.
- Hammershot. Revolver style with a wood-finish handle, 5 in the chamber. Grey and brown turns it dieselpunk.
- Slingfire. Shotgun styled, roughly 40 feet, 6-dart clip, removable stock. A natural steampunk explorer prop.
- Doominator. 4 flippable barrels, 6 darts each, 24 total.
- Wrench Axe, Chainsaw, Z Bat and Machete. The non-blaster melee props, and the closest thing Zombie Strike has to the N-Force melee line.
Disc and licensed shells
Two categories get overlooked as bases and both deserve a look.
- Disc blasters. A Vortex shell has a completely different silhouette from anything that fires a dart, which makes it the shortcut to a prop nobody recognises as a Nerf blaster. The Sharp Shot and Clear Shot are the usual starting points. The Vortex disc blasters covers the whole family.
- Licensed shells. Halo, Star Wars and Marvel blasters are built on standard internals with the interesting part moulded into the outside, so you get the shape for free and only have to paint it. Our guide to licensed blaster shells lists what exists.
Futuristic and alien
- Desolator (Impact Zone, 2016). Flywheel, semi-automatic, up to 10 darts, with clear sections showing the internals. Modded, it makes a convincing stormtrooper blaster.
- Alphahawk (AccuStrike, 2017). A 5-dart rotating drum with a top sight. Orange and grey works as a gauss rifle for a Fallout build.
- Tri-strike (Modulus, 2015). Fires 3 ammunition types: 10 elite darts with slam fire, 4 mega darts, or 1 missile. A natural for a Halo recreation.
- Modulus ECS. 10 darts, 2 rails, barrel extension and detachable stock, with over 30 mods that attach to it. The most modular base on this list.
- Ravager (Alien Menace, 2016). Pump action, 8 darts, rotating barrel, purple and grey. A solid Star Lord prop.
- Incisor (Alien Menace). Drum fed, up to 16 darts, fully automatic, with a Halo-universe look already built in.
Fantasy
The Charmed series is a Rebelle sub-line from 2015 with 4 products on a medieval, steampunk-influenced design.
- Dauntless. Small hand blaster, single fire, reaching up to 75 feet. A good base for an Overwatch Tracer build.
- Fair Fortune. Crossbow, one dart at a time, holds 6, with an encased cylinder hiding the darts.
- Everfierce. A pink and silver bow holding 4 darts upright. The obvious Katniss build.
Rebelle gets its own breakdown on the Rebelle series page, and Zombie Strike has its own hub.
Buying finished props instead
There is a cottage industry of hand painters on Etsy whose work is worth studying even if you never buy. AquativeDesign leaves laser systems and bow mechanisms intact and enhances the rest with metallics. DreemwvrCreation paints intricate battle-marred details and faux wood, and the pieces still shoot. TheGeekArmory offers over 80 made-to-order functioning blasters. Arewethebaddies ships well-researched pieces with faux-worn leather and antique grips.
14 build guides worth reading
If you want somebody else’s full write-up before you start, these are the best of the Instructables archive. Difficulty runs from a 4-step barrel job to a full semi-automatic conversion.
- Ultimate Nerf Vulcan Mod by ManaEnergyPotion. Takes a chain gun to roughly 500 rounds per minute, plus a round counter and paint.
- Ultimate Style Nerf Stryfe Mod by BrittLiv. Adjustable motor speed with 9 LEDs showing the setting.
- Nerf Sledgefire Lever-Action Mod by Master-of-Hardcore. Built for LARP, converts to lever action with an in-line clip.
- District 9 Inspired Nerf Mod by monkeywork. A Stampede with cosmetic mods only.
- Nerf Maverick Barrel Mod by maxmaz2. Lets the cylinder come out farther, in 4 steps.
- Vampire Hunting Gun Prop with UV Bullets by ewilhelm. A costume prop from a Maverick.
- Nerf Double Nightfinder by Amigobot. Two Nightfinders into one weapon.
- Nerf Maverick Air Taser for $25 by Radicaleddd. An affordable capacitor build.
- Nerf Vulcan Modification Project by Zinventor. A fully automatic Vulcan EBF.
- Nerf Gun Modification 101 by pinstripebob. Gets a CS-6 Longshot to roughly 100 feet.
- Nerf Vulcan AC Power Mod by bogott. Turns the Vulcan into a stationary weapon.
- Semi Automatic Longshot Mod by Philysteak527. The hardest one here, and the most impressive.
- Nerf Eliminator Mod by dji435. A simple air restrictor removal.
- Semi-Automatic Nerf Nitron Mod by BrittLiv. Lightweight and easy to control afterwards.
Building a modded arsenal
One set of mods is a project. Three modded blasters is a loadout, and 3 is the number I keep coming back to for Nerf wars. The mods you choose should follow the role each blaster plays.
Your primary should be your best blaster, easy to aim and shooting far. That is the one that earns a spring, a seal and a brass barrel. Mine is the Elite RapidStrike CS-18, mostly for the 18-dart clip.
 For the other 2, go smaller and complementary. The Zombie Strike Hammershot is usually in my rotation, a 5-shot hammer action revolver. The other regular is the Elite Rough Cut 2×4, which fires 2 darts at a time, so aim matters less in an ambush.
Then accessorise. A backpack beats juggling things in your arms, and it carries water, spare ammunition, walkie talkies and your smaller blasters. A holster saves you if you get rushed. A utility belt handles clips and a backup.
It is easy to go overboard. Heavy slows you down and noisy gives you away. The attachments guide covers vests, bandoliers and holsters properly.
Before you commit to a primary, do the recon. Clearing a squad wants capacity. Cover fire wants range. Sneaking wants small and quiet. Then get comfortable with it, because an unfamiliar blaster is close to useless in your hands.
The fastest way past a stuck build is asking somebody who has done it. These are the places worth knowing, and none of these links are affiliate links.
| Resource |
What it is |
What to use it for |
| NerfHaven |
Long-running technical forum |
Archived mods write-ups and the deepest mechanical discussion anywhere |
| r/Nerf |
The main community subreddit |
Current questions, build photos, quick answers on a stuck job |
| Out of Darts |
The hobby’s main specialist shop |
Springs, motors, wiring, hardware kits and printer guidance |
| Printables |
Free 3D model repository |
Printed parts, replacement pieces and full blaster designs |
| Instructables |
Step-by-step build write-ups |
The 14 guides linked further down this page live here |
A note on etiquette that will save you time: search the mods archives before posting. Most beginner questions have a decade of answers behind them, and the people who write the good ones have answered them many times already.
Rather buy one than build one
If you are still choosing the platform itself, our guide to the best Nerf gun to buy, mod and take to war works through that decision before you spend on parts.
Not everybody wants to spend a Saturday with a drill, and there are 2 honest routes around doing the mods yourself.
Buy somebody else’s work. It is a real market, and a good custom piece runs well past $100. The prop sellers above ship finished blasters, and searching Amazon for the same style of work is worth a look too.
Or buy cheap stock blasters and do the mods yourself. That is where Amazon marketplace listings pay off, especially for discontinued blasters. For current production, our new Nerf guns guide covers what is on shelves, and the full blaster list covers everything else.
Is modding a Nerf gun legal?
Nerf gun mods on a blaster you own are a normal hobby activity and the scene operates completely openly. What actually constrains you is narrower and more practical than “is it legal”, and it comes down to 3 things.
- Field limits. Organised Nerf wars publish a maximum fps and chronograph blasters at the door. A blaster built past the local limit is a blaster you cannot use. Find the limit before you pick the spring.
- Warranty. Opening a blaster ends any manufacturer warranty on it. On a discontinued blaster that costs you nothing, which is why most mods happen on old blasters.
- Appearance. This is the one worth taking seriously. Blasters ship in bright colours with an orange tip for a reason. Painting one to look like a real firearm, or carrying any blaster in public, is where a hobby stops being a hobby. Keep them looking like what they are.
Rules differ by country and by state, so check your own rather than assuming. Our Nerf war games guide covers the field-side conventions in more detail.
Frequently asked questions
The questions that come up most about Nerf gun mods, answered from what is on this page.
Which of the Nerf gun mods adds the most range?
A stronger spring, but only after you have fixed the seal and pulled the air restrictors. Doing the spring first on a leaky plunger wastes most of what you paid for.
Do Nerf gun mods void anything?
Nerf gun mods end any warranty and they take the blaster outside the design Nerf tested. That is the trade, and it is why eye protection stops being optional once you have modded one.
What are the cheapest mods worth doing?
The O-ring. It costs pennies, it needs no cutting, and of all the mods here it has the best return for the money.
Which blaster should a beginner mod?
Something cheap and secondhand that you will not mind breaking, and something with well-documented mods behind it. The Recon at around $20 is the classic step up, and the Longshot is the one to leave alone until you are confident.
How much range do Nerf gun mods actually add?
Enough to change how a blaster plays, and less than the forum posts promise. On our own chronograph, a Recon went from 42 to 54 FPS stock up to 75 to 80 FPS with both Orange Mod Works stages. Brass barrels add around 15 feet on their own. Treat all of it as a band rather than a promise.
Are homemade Stefan darts worth it?
They are, and they are the only one of the mods here that saves you money rather than costing it. A 20 foot bag of foam backer rod makes about 75 darts for the price of a small refill pack.
Where to buy the parts
As an Amazon Associate and eBay Partner, we earn from qualifying purchases.
If you want the mod that costs the least and pays the most, it is the O-ring. If you want the one that turns heads, it is the paint.
Related reading: the modder’s toolkit, the paint series, attachments that bolt on instead, the darts to feed a modded blaster, and every Nerf gun ever made.
It’s Nerf or Nothin’!