You can hydro dip Nerf guns at home with a tub of water, a sheet of film and a can of activator. The results look printed on, which is why people assume it needs a workshop. It does not, and here is the whole process in 3 stages, including the prep step that decides whether yours looks good or looks like a smudge.
What is on this page
- What hydro dipping actually is
- Why hydro dip instead of painting
- What you need
- Stage 1: prep, and why it decides everything
- Stage 2: the dip, step by step
- Stage 3: sealing it
- Mistakes that ruin a dip
- Safety and workspace
- The best blasters to hydro dip
- Patterns that work on a blaster
- Buying film and activator
- Frequently asked questions
What hydro dipping actually is
Hydro dipping is also called water transfer printing, or hydrographics. It floats a printed film on water, dissolves it into a layer of liquid ink, then wraps that ink around whatever you push through the surface.
The ink follows every curve. That is the whole reason to hydro dip Nerf guns rather than spray them freehand. It is also why a dipped shell looks like it was printed at the factory rather than painted by hand.

The important thing to understand: the film carries the pattern, not the colour underneath it. Most hydrographic films are mostly transparent. What you see afterwards is the pattern sitting on top of whatever base colour you sprayed first.
That single fact is why people who hydro dip Nerf guns without a base coat end up disappointed. The pattern is there, it is just lost against bright orange plastic.
Why hydro dip Nerf guns instead of painting them?
Both get you a custom blaster. They are good at completely different things, and picking the wrong one is why people end up disappointed.
Painting gives you control. You decide exactly where every colour goes, you can do clean two tone splits along panel lines, and you can touch up a scratch later with the same can.
Hydro dipping gives you complexity you could not paint. A carbon weave or a dense camo has thousands of elements in it. Reproducing that by hand needs an airbrush, stencils and a lot of practice. The film does it in ninety seconds.
The other real difference is repeatability. If you want four blasters to match for a team, hydro dipping from the same roll gets you there far more reliably than four hand paint jobs will.
Cost is close. Once you own primer, base coat and clear coat, the extra spend to hydro dip Nerf guns is the film and the activator, and a kit covers a blaster with a spare sheet.
The honest downside is control. You do not get to choose where on the shell a given part of the pattern lands. The film wraps where it wraps, and two dips from the same sheet will not be identical.
If that unpredictability bothers you, paint. If it appeals, dip.
What you need to hydro dip Nerf guns
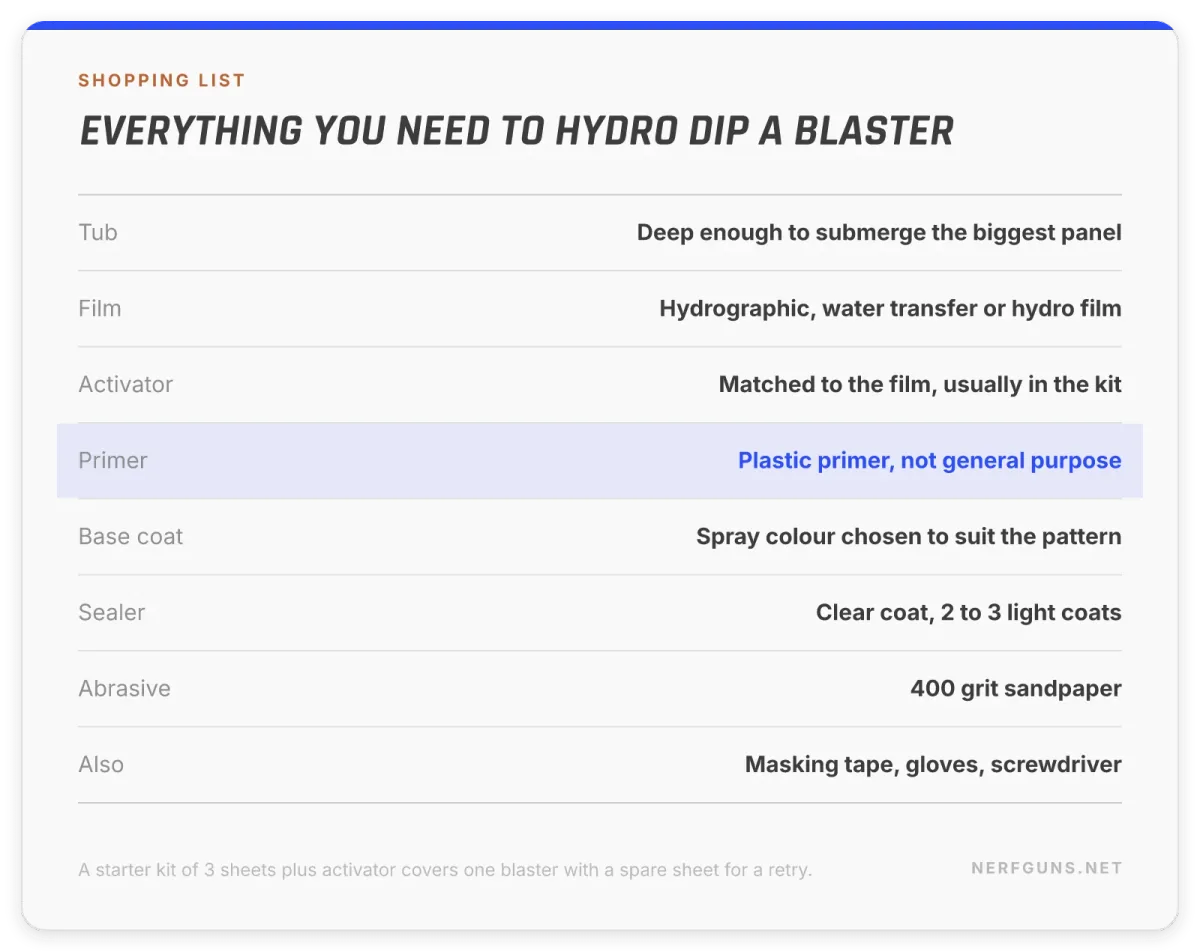
- A large tub. Deep enough to fully submerge the biggest shell piece, and wide enough that the film can lie flat with room around it.
- Hydrographic film in the pattern you want.
- Activator spray, matched to the film.
- Plastic primer. A primer made for plastic, not a general purpose one.
- Base coat spray paint in a colour that suits the pattern.
- Clear coat sealer.
- 400 grit sandpaper.
- Masking tape, for bordering the film.
- Gloves, because you are putting your hands in dissolved ink.
- A screwdriver to strip the blaster down.
A kit is usually the cheapest way to hydro dip Nerf guns for the first time. Most sell a few sheets of film with a can of activator, which is enough for one blaster with room to make a mistake.
Stage 1: prep, and why it decides everything
People want to skip to the dip. The dip is the fun part and it is not the part that decides the result.
Before you hydro dip Nerf guns, the shell has to come apart, get sanded, get primed and get a base coat. Every one of those steps shows in the finished blaster.
Strip the blaster completely. Shell halves off, internals out, every part you are not dipping set aside. Photograph it as you go, because reassembly is where first timers come unstuck.
Sand lightly with 400 grit. You are not removing material, you are giving the primer something to key into. A minute per panel is enough.
Prime with a plastic primer. Something like a Krylon plastic primer is made to bond to the kind of plastic a blaster shell is moulded from. Standard primer will lift later.
Then spray your base colour and let it cure properly. Not touch dry, cured. Rushing this is the most common reason a dip goes wrong, because the film’s activator will attack a soft base coat.
On base colour: white and light greys make patterns pop, black makes them subtle and moody, and metallics under a transparent film look expensive. Match it to the pattern rather than picking a favourite.
If you want the full paint process in more depth, our step by step guide to painting a Nerf gun covers primer, coats and curing in detail. Steps 1 to 5 of that guide are exactly the prep you need here.
Stage 2: the dip, step by step
This is the shortest stage of the whole job. It looks intimidating on video and takes about ninety seconds in practice.
- Cut the film to size, leaving about 4 inches of margin on every side so it can wrap around the shell as it goes through.
- Fill the tub with warm to hot water, deep enough to fully submerge the piece.
- Tape a border around the film’s edges so it cannot curl up on itself when it hits the water.
- Lay the film on the surface, holding it like a loose hammock and letting the middle touch first, then easing the sides down. Trapped air under the film becomes a blank patch on your shell.
- Wait about 60 seconds while the film takes up water and goes soft.
- Spray the activator evenly across the whole sheet. The film turns from a solid sheet into floating liquid ink. Even coverage matters more than heavy coverage.
- Dip the part at roughly 45 degrees, slowly, until it is fully under.
- Level it out under the water and move it gently sideways, the way you would sift a pan, to shed leftover film.
- Rinse under cold water for a minute or so to clear the residue.
Go slow on the entry. The single biggest difference between a clean dip and a smeared one is the speed you push the part through the surface.
If it goes wrong, it is not a disaster. Sand it back, respray the base coat, and dip again. That is the whole recovery, and it is why this is a good technique to learn on a cheap shell.
Stage 3: sealing it
Sealing is the step people skip when they hydro dip Nerf guns, and it is the one that decides how long the finish lasts. The ink layer on a freshly dipped shell is thin and it will wear off. This step is not optional.
Let every part dry fully, then apply 2 to 3 coats of clear coat sealer. Light coats, not one heavy one. A heavy coat will run and take the pattern with it.
Matte clear reads more like a factory finish on a blaster. Gloss looks better in photographs and shows every fingerprint.
Let the clear cure before reassembly. Screwing a shell together over soft clear coat presses marks into it permanently.
There is a lot more on sealing, including how many coats different finishes actually need, in part 11 of our free painting guide.
Mistakes people make when they hydro dip Nerf guns
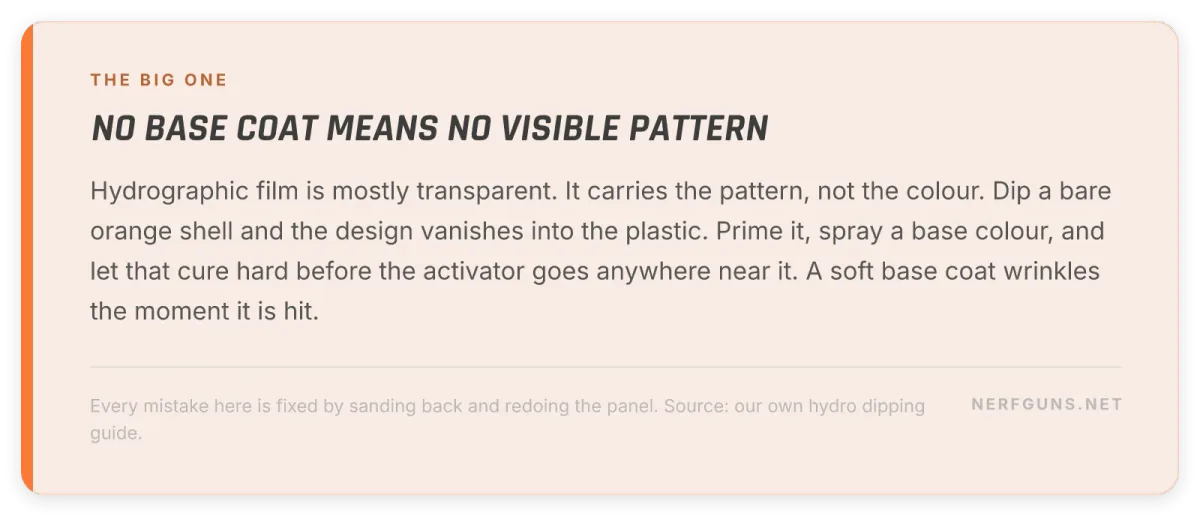
- No base coat. The pattern disappears into the original plastic colour. This is the number one reason a first attempt looks like nothing happened.
- Base coat not cured. Activator attacks soft paint and you get a wrinkled mess.
- Water too cold. The film will not soften properly and it tears as you dip.
- Too much activator. The ink goes runny and slides off the part instead of wrapping it.
- Dipping too fast. Smears, every time.
- Air trapped under the film. Leaves a bare patch you will not spot until it is out of the water.
- Skipping the clear coat. The pattern rubs off within a few games.
- Dipping parts that move. Ink adds thickness. Dipping the inside of a sliding surface can bind it.
None of these are fatal, which is the forgiving thing about learning to hydro dip Nerf guns. Every one of them is fixed by sanding back and starting the panel again, which costs you an afternoon and no money to speak of.
Safety and workspace
Everything you need to hydro dip Nerf guns safely is cheap and obvious. This is a solvent job, and it deserves the same respect as any other solvent job.
Work outdoors or somewhere with real airflow. Primer, base coat, activator and clear coat are all aerosols. A garage with the door open is fine. A bedroom with a window cracked is not.
Wear gloves. You are putting your hands into water with dissolved ink and activator in it. Nitrile gloves cost almost nothing and save a lot of scrubbing.
Eye protection while spraying. Aerosols bounce back off flat panels more than people expect.
Use a tub you are willing to dedicate to this. Ink residue stains, and you will not want it back in the kitchen afterwards.
Keep the water off anything electrical, which sounds obvious until you are dipping in a garage with an extension lead on the floor.
Dispose of the water sensibly. Skim the leftover film off the surface with a piece of scrap card before you drain it, or you will be cleaning ink out of a sink trap.
One more, and it matters if the blaster is going back into use: keep everything out of the internals. Ink and clear coat inside a plunger tube or on a flywheel cage causes problems that are genuinely annoying to undo. Strip properly and dip shell parts only.
The best blasters to hydro dip
Some shells make this easy and some make it a fight. If you want to hydro dip Nerf guns successfully on the first go, pick the shape carefully.
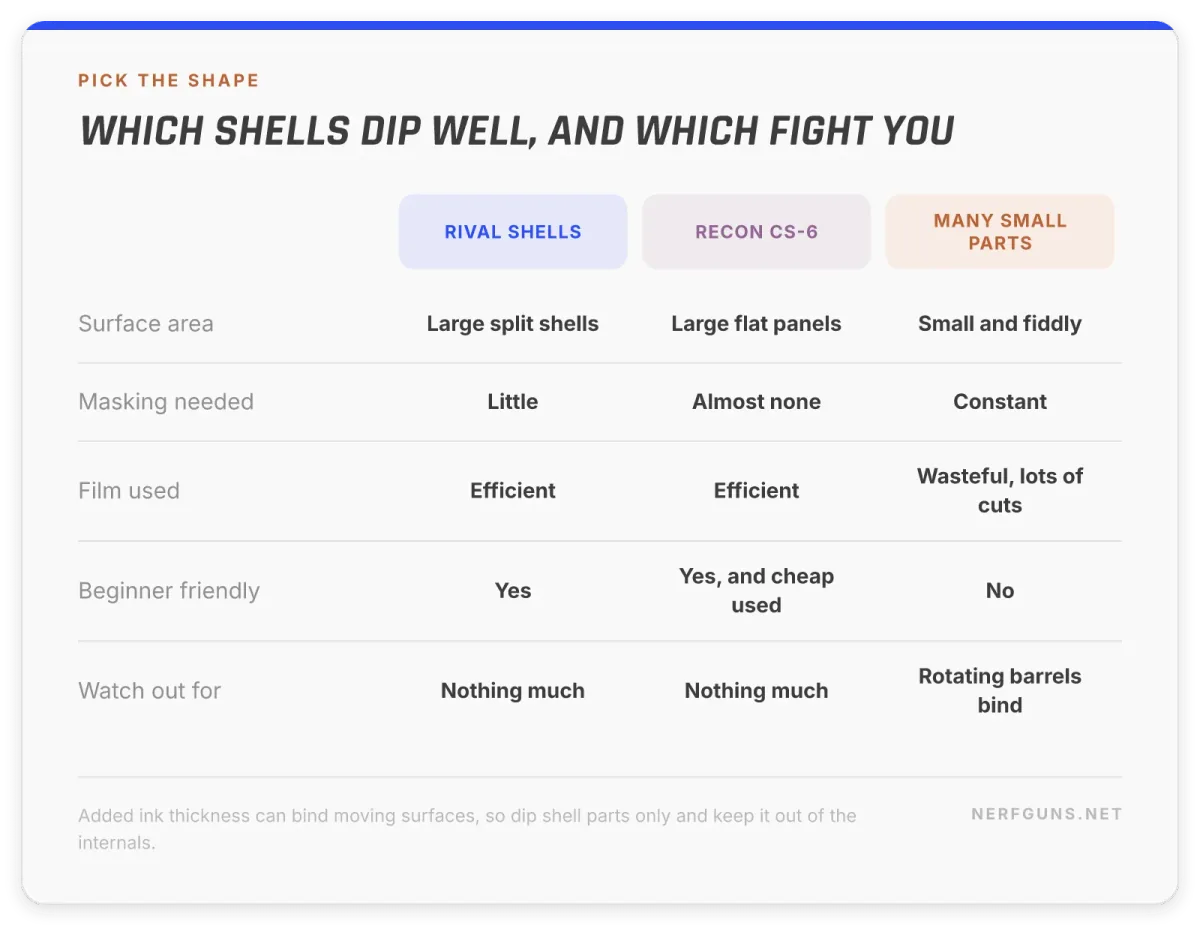
The shells that suit this best are easy to describe. What you want is large, flat, separable panels. Big surfaces give the pattern room to read, and separable pieces mean less masking and easier handling.
Rival blasters are ideal. Anything in the Rival series has large split shells with plenty of surface area, which gives you a proper canvas.
The Recon CS-6 is the classic learner. It comes apart into flat panels with almost no masking, the pieces are small enough to hang and spray easily, and used ones are cheap enough that a ruined attempt is a lesson. Our Recon CS-6 review covers why that shell is so friendly to work on.
What to avoid: blasters made of many small pieces, which need endless film cutting. Also anything with a large rotating barrel or exposed moving parts, where the added thickness binds and the finish ends up patchy.
Both of those are used-market picks, so here is the current-shelf version. If you would rather dip something you can still buy new, two families fit the large flat panel rule.
- Nerf Rival Kronos XVIII-500 | a breech-load Rival with exactly the big split shell this section is about. Amazon lists it at ages 14+, so treat it as a competitive-class blaster rather than a starter one. Nerf Rival Kronos XVIII-500 on Amazon
- Nerf Loadout Galactic Commander | the current large-shell motorized model. Amazon’s listing says it ships with 3 attachment accessories, and those are 3 more separate panels you can dip while the tub is already full. Nerf Loadout Galactic Commander on Amazon
The rule does not change with the model. Large flat panels dip well, moving parts do not, and anything that slides stays out of the tub.
If you would rather build up the internals while the shell is apart, the routes and tools are all in the Nerf gun mods guide and the modder’s toolkit checklist.
Patterns that work on a blaster
Film comes in hundreds of designs and only some of them suit something blaster shaped. Choosing badly is the quietest way to hydro dip Nerf guns and still end up unhappy.
The patterns that consistently work on Nerf shells are camo, carbon fibre, star and universe prints, sticker bomb and flame. Those are the ones people who hydro dip Nerf guns come back to, and there is a reason.
Scale is the whole game. A pattern with a large repeat will only show you one or two elements of it on a shell panel, which reads as random blotches rather than a design. Small, dense, repeating patterns look intentional at blaster size.
Carbon fibre is the safe first choice the first time you hydro dip Nerf guns. It is small scale, it is forgiving of an imperfect dip, and it looks right on a piece of moulded plastic.
Camo is the most popular and the easiest to get wrong, because camo films are often printed at a scale meant for a rifle stock or a car panel rather than a toy.
If you want the pattern to be the point, go dark on the base coat and let a bright film carry it. If you want something subtle, invert that.
Buying film and activator
As an Amazon Associate I earn from qualifying purchases. The Amazon links on this page are affiliate links. They cost you nothing extra and they are what keeps this catalogue updated. See our affiliate disclosure.
The supplies you need to hydro dip Nerf guns are sold under several names, so search terms matter here. Water transfer film, hydrographic film and hydro film are the same product. Searching all three returns different listings.
| # | What | Which one | Why |
|---|---|---|---|
| 1 | The film | Search hydrographic film | Also sold as water transfer film or hydro film. Buy more than one sheet. |
| 2 | Activator | Search activator spray | Match it to your film. Kits usually include it. |
| 3 | Plastic primer | Search plastic primer | Made to bond to blaster plastic. General primer lifts. |
| 4 | Clear coat | Search clear coat sealer | 2 to 3 light coats. Without this the pattern wears off. |
| 5 | Sandpaper | Search 400 grit sandpaper | Keys the surface for primer. One pack lasts several projects. |
A starter kit with 3 sheets and an activator can is enough to hydro dip Nerf guns once, with a spare sheet for a retry. Buy the spare sheet. You will want it the first time.
Bonus tip: film and activator make an easy gift. Nobody ever guesses hydrographic film. Put the film, the activator, the primer and the clear coat on a free Nerf wish list and family get one link instead of a puzzle. It is the cheapest way to hydro dip Nerf guns without buying every can yourself.
Frequently asked questions
Can you hydro dip Nerf guns without a kit?
You need the film and the activator, and those come as a kit more cheaply than separately. Everything else is a tub, sandpaper, primer, paint and clear coat from any hardware shop.
Do you have to sand the shell before you hydro dip Nerf guns?
Yes, lightly, with 400 grit. You are keying the surface so the primer bonds. Skipping it is why finishes peel later.
How long does it take to hydro dip Nerf guns?
An afternoon of work spread over two days. The dip itself is about ninety seconds. Everything else is stripping, sanding, priming, base coating and letting each layer cure properly.
Does the pattern come off?
It will, unless you seal it. Two to three light coats of clear coat is what turns a dipped shell into a durable one.
What water temperature do you need to hydro dip Nerf guns?
Warm to hot. Cold water will not soften the film properly and it tears as you dip.
Can you hydro dip Nerf guns more than once if it goes wrong?
Yes, and this is the best thing about the technique. Sand it back, respray the base coat, and dip again. The only cost is another sheet of film and an afternoon.
What is the best blaster to hydro dip Nerf guns on first?
Something with large flat panels and few pieces. A Rival blaster or a used Recon CS-6 are both easy to work on and cheap enough that a mistake does not matter.
Is hydro dipping better than painting?
It is different, and the section above covers the trade in full. Painting gives you control over exactly where colour goes. Hydro dipping gives you an intricate repeating pattern that would take an airbrush and a lot of skill to reproduce by hand.
It’s Nerf or Nothin’!