

Every new modder asks the same question: which blaster do I cut into first. Pick wrong and you learn nothing except how to lose 14 screws. These are the 3 blasters we hand a beginning modder, and the order to work through them.
The selection rule is narrow on purpose. A first blaster has to come apart without a fight, go back together without a diagram, and be cheap enough that ruining it is a lesson rather than a loss.
What is on this page
- The 3 starter blasters at a glance
- What makes a blaster right for a beginning modder
- The 3 best Nerf guns to mod first
- Know which kind of blaster is on your bench
- The first mods, in the order to do them
- What each mod is actually worth
- Where a modder goes next
- Blasters to leave alone for now
- What a new modder actually needs
- Mistakes that cost people a blaster
- Where to buy
- Frequently asked questions
The 3 starter blasters at a glance
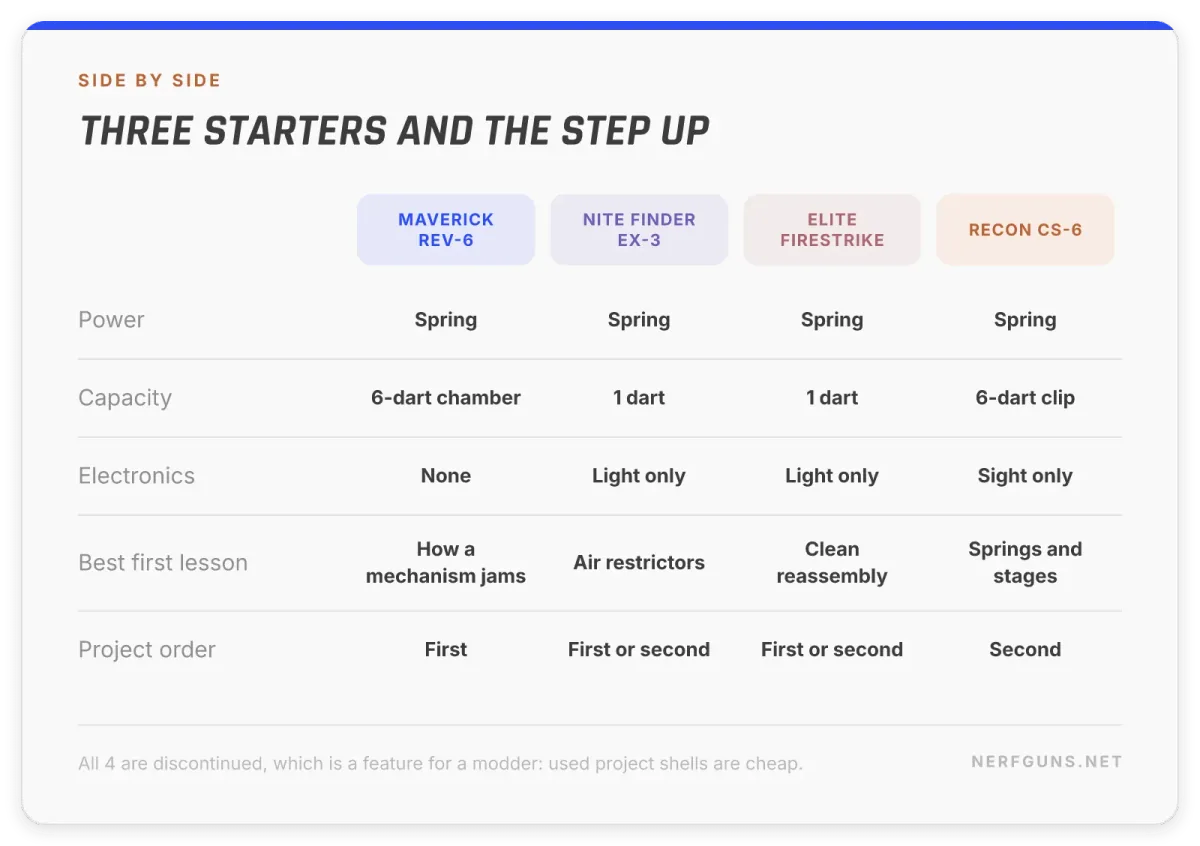
- Start here: the Maverick REV-6. Simple internals, forgiving, and the most documented blaster in the hobby.
- Best for learning air restrictors: the Nite Finder EX-3, a single-shot pistol with almost nothing in the way.
- Best shell to work in: the Elite Firestrike, which comes apart and closes again more cleanly than either.
- Your second project: the Recon CS-6, once you have opened something and closed it successfully.
All 3 starters are spring blasters with no electronics. That is deliberate, and the next section is why it matters more than anything else on the list.
What makes a blaster right for a beginning modder
The blasters people recommend to a beginning modder are not the best blasters. They are the most forgiving ones, which is a completely different quality.
1. Spring powered, not motorized. A spring blaster has a plunger, a spring and a seal, and every one of them is something you can see. A flywheel blaster hides its interesting parts behind wiring and a battery, and the modder who starts there is troubleshooting electrics before understanding airflow.
2. Visible screws, and not too many. Hidden screws under stickers or inside grips are how a first shell gets cracked. The blasters below have their screws where you can see them.
3. It goes back together. This is the one nobody warns a new modder about. Plenty of blasters open easily and then refuse to close because a spring, a catch and a trigger bar all have to seat at once.
4. Cheap enough to write off. Your first blaster is a teaching aid. Treat the cost as tuition and the pressure disappears.
Here is the thing: a modder who ruins a cheap pistol learns the same lesson as one who ruins a flagship, at a fraction of the price.
The 3 best Nerf guns to mod first
1. Nerf Maverick REV-6

The Maverick is the blaster more modders have opened than any other, and that is its real advantage. Whatever goes wrong, somebody has already written it up.
It is a 6-dart revolver, spring powered, with no electronics anywhere to complicate a first teardown. The classic first job on one is the full barrel drop, which shortens the path a dart travels before it leaves.
Its weakness is also instructive. The trigger-driven rotating chamber jams, which teaches you to diagnose a mechanism rather than just swap parts.
Best for the first shell any modder opens. Our Maverick feature covers the mechanism and the collector runs, and the clear-bodied version is genuinely useful for seeing what is happening inside.
2. Nerf Nite Finder EX-3

A single-shot pistol with straightforward internals, which is exactly what you want for the mod every modder does second: air restrictor removal.
There is no rotating chamber, no clip and no feed mechanism to reassemble. Take the shell off and the plunger, spring and restrictor are right there. Nothing else is competing for your attention.
It also has a light and a battery compartment, so if you want to tinker with LEDs later, the wiring space already exists. That is a rare thing on a blaster this simple.
Best for understanding what an air restrictor is by removing one. It is discontinued, so this is a used-market buy.
3. Nerf N-Strike Elite Firestrike

The Firestrike is the Nite Finder’s Elite-era successor, and the reason it earns a place on its own is the shell. It comes off and goes back on more cleanly than either blaster above.
That sounds minor until your third reassembly. A shell that closes without a fight is what lets a beginning modder iterate: open it, change one thing, close it, test, repeat. That loop is where the learning happens.
It is also a good paint canvas, with flat panels and few awkward curves. Our paint guide covers prep, which is where most paint jobs are lost before they start.
Best for the modder who wants to change one variable at a time.
What a beginner can buy new in 2026
Worth saying plainly, because all 3 picks above are used-market blasters. None of them has been made for years, and a beginning modder standing in a shop today cannot buy any of them.
That is not an accident, and it is not a problem either. A first mod platform wants two things: shells cheap enough that ruining one costs nothing, and a large pile of existing write-ups from people who already made every mistake. Discontinued blasters win both by definition. A used Maverick is pocket change and has been opened by more modders than anything else in the hobby.
If you want something new anyway, here is the honest read on the current shelf.
- A current spring pistol is fine. Anything simple, spring powered and clip-free follows the same logic as the Nite Finder. The mechanism has not changed.
- Loadout is a poor FIRST platform, and this is a reason rather than a preference. The line ships attachments in the box, which is genuinely good value, and it runs N1 darts. Amazon’s own refill listing says those darts are compatible only with N Series blasters. So a beginner mod platform that cannot be fed from the communal dart tub, and has almost no teardown write-ups behind it yet, is a harder place to learn than a blaster everybody has already documented.
- Buy the used one to learn on, then buy new once you know what you like. That order costs less and teaches more.
None of this makes the current blasters bad. It makes them a second purchase rather than a first one, which is a different criticism entirely and the only one a beginning modder needs.
Know which kind of blaster is on your bench
Before a modder orders a single part, work out what they are holding. There are 3 families and they mod completely differently.
Spring blasters. A trigger plus a separate cocking mechanism means a spring blaster. All 3 starters on this page are in this family, and it is where springs, seals and air restrictors apply.
Pump blasters. You pump air into a reservoir and the trigger releases it. Related, but the parts that matter are the pump seal and the valve rather than a plunger spring.
Flywheel blasters. A motor whine before the dart leaves. Nothing on the spring list applies, and the mods here are electrical: motors, wiring and batteries.
Getting this wrong is how a new modder ends up with a spring kit that does not fit anything they own. Ordering parts for the wrong family is the most expensive mistake on this page and the easiest to avoid.
The first mods, in the order to do them
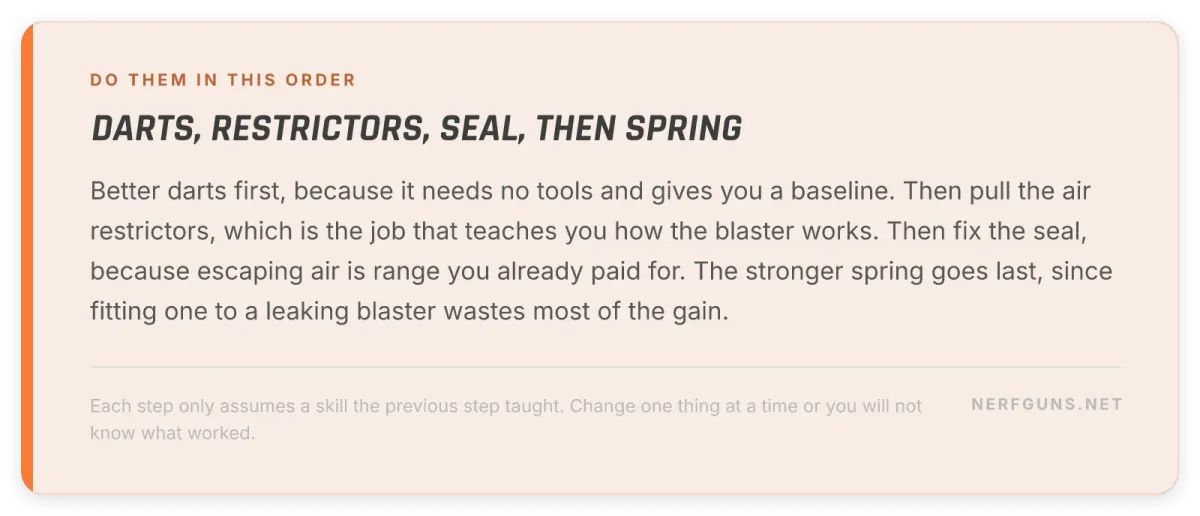
The order matters, because each step assumes only skills the previous one taught. Our full Nerf mods guide covers all 6 in depth.
Step 1: better darts. No tools, no disassembly, and it is worth 10 to 15 feet on most blasters. Doing this first also gives you a baseline, so you know what your blaster does before you change it.
Step 2: remove the air restrictors. This is the mod that teaches a modder how a blaster actually works. Open the shell, find the plastic prongs in the barrel path, take them out. No parts to buy.
Step 3: improve the seal. Air escaping around the plunger is range you paid for and did not get. This is fiddly rather than difficult, and it is the step that separates a modder from someone who follows instructions.
Step 4: a stronger spring. This is where the range lives, and it is the one every modder eventually does. Leave it until last, because a stronger spring in a blaster with a bad seal wastes most of the gain.
Do them in that order on one blaster and you will understand more than reading 20 tutorials.
What each mod is actually worth
New modders overestimate the exciting mods and underestimate the boring ones. This is roughly how they rank on effort against reward.
| Mod | Effort | What it gives you |
|---|---|---|
| Better darts | None | 10 to 15 feet on most blasters, no tools |
| Air restrictor removal | Low | Real gain, and it teaches you the blaster |
| Seal improvement | Medium | Recovers range you are currently losing |
| Stronger spring | Medium | The biggest single range gain available |
| Paint and shell work | High patience | Nothing measurable, everything visible |
| Voltage and LiPo | High, with risk | Rate of fire, and the most likely to go wrong |
The pattern is worth naming. The 2 cheapest jobs on that table deliver most of what a beginning modder is actually chasing, and the 2 most dramatic ones deliver the least per hour spent.
Paint is the exception that proves it. It changes nothing you can measure and it is the mod people notice, which is why a modder who only cares about range still ends up painting something eventually.
Where a modder goes next
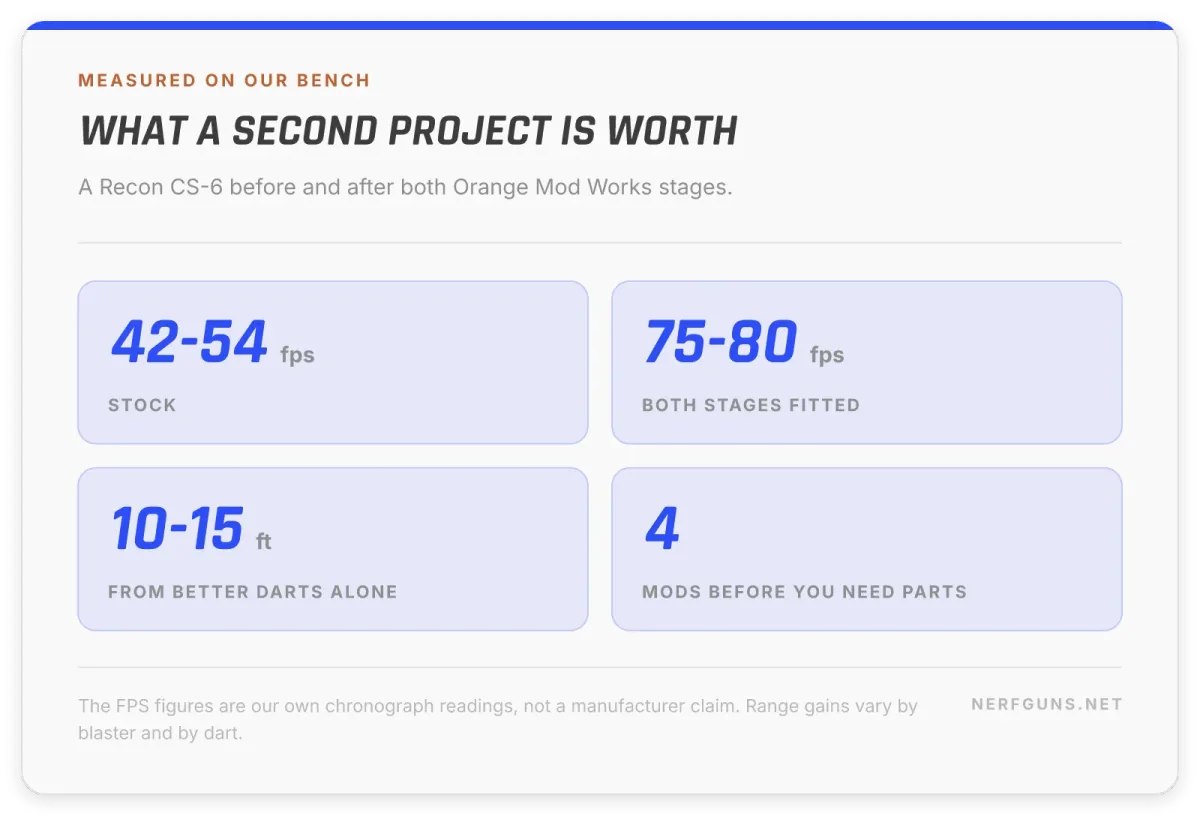
Once you have opened a pistol and closed it successfully, the step up is a clip-fed blaster. This is where a modder stops making a toy louder and starts building something they will actually use.
The Recon CS-6 is the classic second project. It is essentially a bigger Maverick with a clip, and on our own chronograph a Recon went from 42 to 54 FPS stock up to 75 to 80 FPS with both Orange Mod Works stages fitted. That is a measured figure from our bench rather than a claim off a box. Orange Mod Works sent us those kits free to test.
Its internals do have a hard limit, which is worth knowing before you spend on parts. Our Recon CS-6 review is honest about where the modding stops paying off.
The Longstrike is the other good second blaster. Alongside the Recon it was the easiest of the classic step-up blasters we worked through, by a wide margin.
After that, a modder usually picks a direction: range, capacity or looks. They pull against each other, and choosing one is what turns a collection of mods into a build.
Blasters to leave alone for now
This is the section the guides skip, and it saves more blasters than the recommendations do.
The Longshot CS-6. The blaster every new modder wants first because of its reputation. Leave it until you are confident. Our Longshot review explains what you are taking on.
Anything with a breech mod as the goal. On some blasters the air restrictor cannot simply be pulled out, it has to be drilled, and a breech mod means destroying stock parts. That is a one-way door and a poor first door to walk through.
Motorized blasters, and anything involving a LiPo battery. Voltage mods are the most likely of all the mods to end in a melted shell, and LiPo cells carry a real fire risk handled wrong. When you do get there, read the LiPo safety checklist before you buy a cell, not after.
Any blaster you would be upset to break. The rule is not about difficulty. If a blaster has sentimental value, it is the wrong bench project regardless of how simple its internals are.
What a new modder actually needs
Less than the tutorials imply. You do not need a workshop to start.
- A long-shaft Phillips screwdriver. The single most important item. Blaster screws sit at the bottom of deep wells and a short driver will chew them.
- A container for screws. Put them in it the moment they come out. Every modder loses a screw exactly once before adopting this habit.
- Your phone camera. Photograph each stage as you open the shell. This is the free tool that saves the most reassemblies.
- Needle-nose pliers and a craft knife. Enough for air restrictors and trimming.
- Eye protection. Springs under compression leave in a hurry.
Our modder’s toolkit checklist has the full list split into what you need before you open anything, what you need for reassembly, and what can wait.
Bonus tip: ask for the tools, buy the blaster yourself. A used Maverick costs pocket change, and the screwdriver, the tray and the eye protection are the bits people never get round to buying. Put them on a free Nerf wish list next to the modder’s toolkit checklist, and a first bench arrives in one birthday.
Mistakes that cost people a blaster
Opening the shell over carpet. Springs and small parts leave at speed and the carpet keeps them. Work over a tray or a towel.
Forcing the shell closed. If it will not close, something inside is not seated. Forcing it cracks posts, and cracked posts mean the shell never sits properly again.
Changing 2 things at once. If range improves, you will not know which change did it. If the blaster stops working, you will not know which change broke it.
Buying parts before opening anything. A modder who orders a spring kit first often finds the blaster needed a seal, not a spring. Open it, look, then order.
Skipping the dart upgrade. It is the cheapest gain available and people leap past it to the interesting mods. Our dart guide covers what is worth buying, and reshaping worn darts costs nothing at all.
Where to buy
As an Amazon Associate and eBay Partner, we earn from qualifying purchases. The Amazon and eBay links on this page are affiliate links. They cost you nothing extra. See our affiliate disclosure.
All 3 starter blasters are discontinued, so these are search links rather than fixed product pages. A search link cannot 404 when an individual used listing sells.
- Current Maverick REV-6 listings, the first blaster to open.
- Nite Finder EX-3 listings.
- Elite Firestrike listings.
- Elite dart refills, which is step 1 above.
Where these actually turn up: eBay
Amazon stock on a blaster nobody has made since 2014 is luck. eBay is where the project shells live, and it is where we would look first for all 3.
These are searches rather than single listings on purpose. A used listing sells and vanishes; a search still works next month.
- Maverick REV-6 on eBay, usually the cheapest of the 3 and the one to start on.
- Nite Finder EX-3 on eBay.
- Elite Firestrike on eBay.
- Recon CS-6 on eBay, for when you are ready for the second project.
Buying used, 3 things to check in the photos. That the shell screws are all present, that the orange trigger and priming handle are not cracked, and that any clip pictured actually comes with it. A missing clip turns a cheap blaster into an expensive one.
We do not publish prices, because a discontinued blaster costs whatever the market is doing this month and a figure written today is wrong by next season. Our guide to where to buy Nerf blasters covers which source suits a modder hunting cheap project shells.
Frequently asked questions
What is the best Nerf gun to mod for a beginner?
The Maverick REV-6. Simple spring internals, no electronics, and more written-up mods than any other blaster, so a beginning modder is never the first person to hit a given problem.
What are the best Nerf guns to mod overall?
It depends what you want. For learning, the 3 pistols on this page. For a blaster you will keep using, the Recon CS-6 or the Longstrike. For raw range, any spring blaster whose seal you are willing to work on.
Which mod should a modder do first?
Better darts, before you open anything. It costs nothing in skill, is worth 10 to 15 feet on most blasters, and gives you a baseline to measure the real mods against.
Do I need to buy a spring kit?
Not to start. Air restrictor removal needs no parts at all, and a modder who fixes the seal first gets more from a spring later. Open the blaster and look before you order anything.
Can you mod a motorized blaster as a first project?
You can, and we would not. Voltage mods are the likeliest of all the mods to melt a shell, and a flywheel blaster hides the parts that teach you the most. Start with a spring pistol.
Will modding break my blaster?
Sometimes, and that is why the first one should be cheap. The failures a modder learns most from are the ones that cost the least, which is the entire logic behind this list.
How much range does modding actually add?
More than most people expect. On our own chronograph a Recon went from 42 to 54 FPS stock to 75 to 80 FPS with both Orange Mod Works stages. We label manufacturer claims as claims rather than restating them as results.
Are these blasters still made?
No. All 3 are discontinued, which is a feature rather than a problem for a modder: used project shells are cheap, and nobody minds if a used Maverick does not survive.
How long does a first mod take?
An afternoon for the first one, and about 20 minutes once you have done it twice. Most of the first attempt is spent working out how the shell comes apart, which is knowledge you only pay for once per blaster.
Is modding a Nerf blaster safe?
The mechanical mods are, with eye protection and sensible handling of a compressed spring. The electrical ones are where a modder can genuinely get hurt, which is why voltage and LiPo work sits behind its own safety checklist rather than in a beginner list.
Can I mod a blaster without opening it?
Only the dart upgrade, and it is still the best value change available. Everything else on this page needs the shell off, which is exactly why the first blaster you choose should be one that closes again easily.
What should I read next?
The Nerf mods hub for the 6 mods in depth, and our guide to buying, modding and playing if you want to know how a modded blaster fits into an actual game.


I didn’t know how different these guns were in terms of difficulty to modify, this was really helpful thanks.
I would definitely have to increase striking power.
You should add something me more guns for beginning modders like the strongarm or other single shot blasters.
Yeah, The Strongarm’s a good one! The next update for this list I’ll be sure to add it, along with single shot blasters like the Jolt.