

Nerf gun maintenance is the difference between a blaster that still hits hard in year 5 and one that goes soft in a single season. The work is small. Here is the routine I run on my own shelf, the 7 habits behind it, and the 5 mistakes that quietly kill a blaster.
What is on this page
- What you need for nerf gun maintenance
- The nerf gun maintenance schedule
- The 7 habits, in order
- Spring blasters: the two habits that matter
- Pump and air blasters: seals and leaks
- Flywheel blasters: motors and batteries
- Which lubricant, and which one wrecks a blaster
- Dart care, because most jams start there
- Custom painted blasters: keeping the finish
- Storage: putting a blaster away for months
- Can a Nerf blaster get wet?
- What modding does to the bill
- 5 mistakes that cost people a blaster
- Gear for nerf gun maintenance
- Frequently asked questions
What you need for nerf gun maintenance
You do not need a bench full of tools. Most nerf gun maintenance happens with 4 items and about 10 minutes.
- A precision screwdriver set with a real PH0 and PH1. A household screwdriver cams out and rounds the head off, and a rounded screw head means drilling it out.
- White lithium or silicone grease. Plastic safe, and it stays where you put it.
- Rags and cotton swabs. For dust, grit and old grease in the corners a rag cannot reach.
- A parts tray, or an ice cube tray. A teardown produces 12 to 20 screws in 3 different lengths and they are not interchangeable.
That is the whole kit for keeping a blaster alive. If you are heading further into modding, the full bench list lives in the modder’s toolkit checklist.
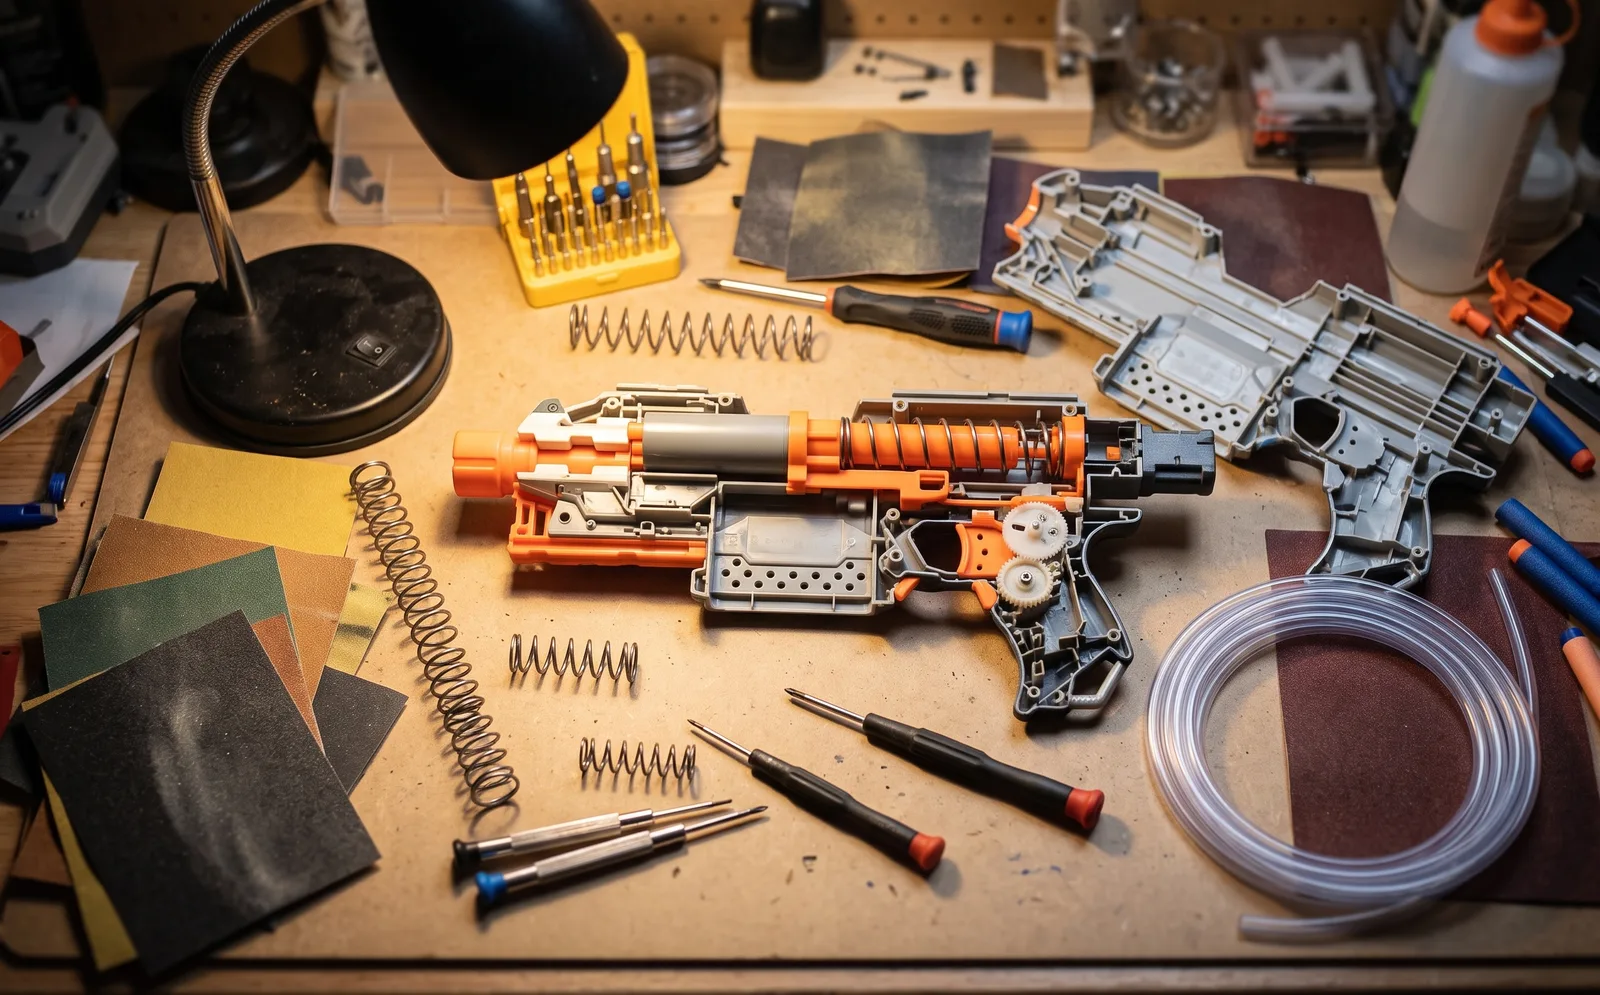
One habit before any of the others. Photograph every stage before you pull a shell apart. The spring, the trigger linkage and the flywheel wiring all go back exactly one way, and a photo takes 4 seconds.
The nerf gun maintenance schedule
Nerf blasters are durable. They are also toys built from hard plastic, and nothing about that plastic was designed to last forever under a modded spring.
So the nerf gun maintenance schedule below is built around use, not around the calendar. A blaster you take to a war every weekend wants the short intervals. One that lives on a shelf does not.
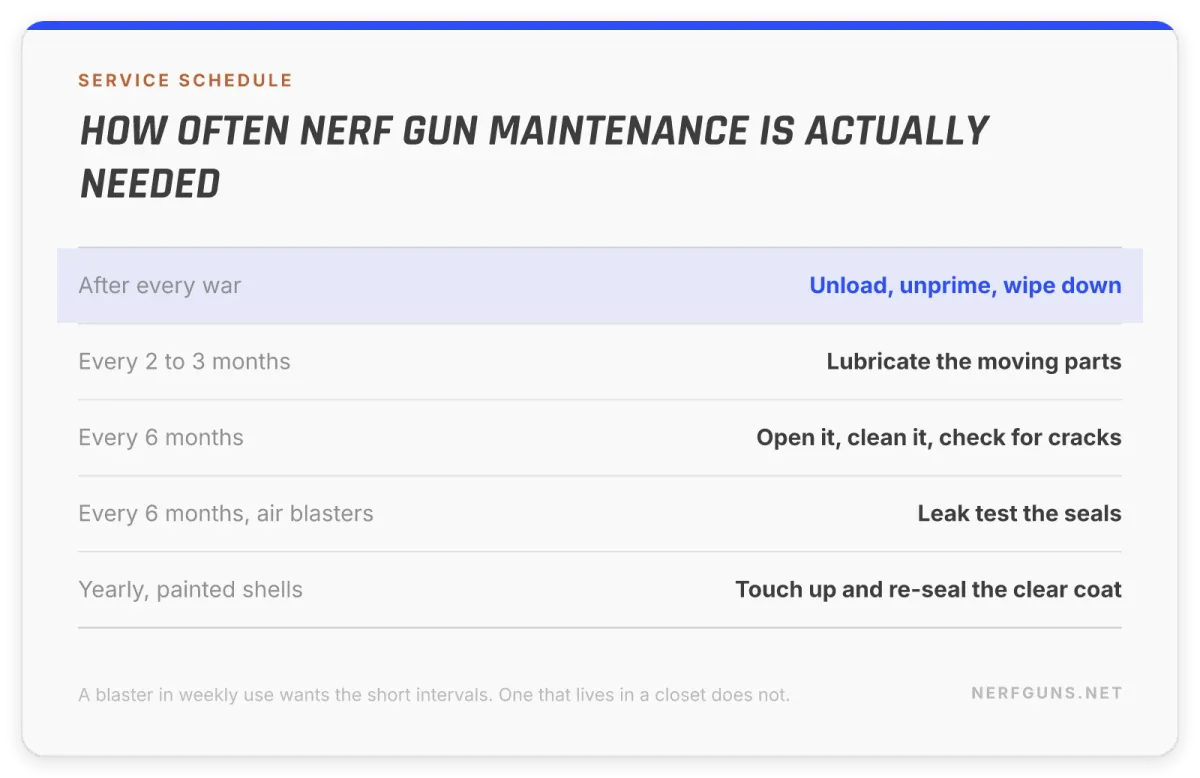
Bottom line: nerf gun maintenance is 2 minutes after a game and 20 minutes twice a year. That is the entire commitment.
The 7 habits, in order
Every section below expands one of these. These 7 habits are the whole of nerf gun maintenance, and if you only ever read this list you have most of it.
- Unload and unprime before the blaster goes away.
- Wipe it down after every war, before the grit dries on.
- Lubricate the moving parts every 2 to 3 months.
- Open it and look every 6 months, and after any hard fall.
- Leak test air blasters at the same 6 month mark.
- Rotate your darts and reshape the bent ones.
- Keep painted shells sealed and out of direct sun.
Notice what is not on the list. Nothing here costs money, and nothing here needs the shell open more than twice a year.
Spring blasters: the two habits that matter
Springers are the easiest blasters to maintain and the easiest to ruin. Two habits carry almost all of it.
Do not dry fire. Dry firing is pulling the trigger with no dart in the chamber. With no dart to absorb the air, the plunger head slams into the post at the back of the barrel.
On a stock blaster that chips the post over months. On a blaster running an upgraded spring it can crack it in an afternoon. This is the single most common self-inflicted injury in nerf gun maintenance.
Do not store it primed. A compressed spring left compressed loses tension it does not get back, and a loaded clip in a primed blaster does the same thing to the magazine spring.
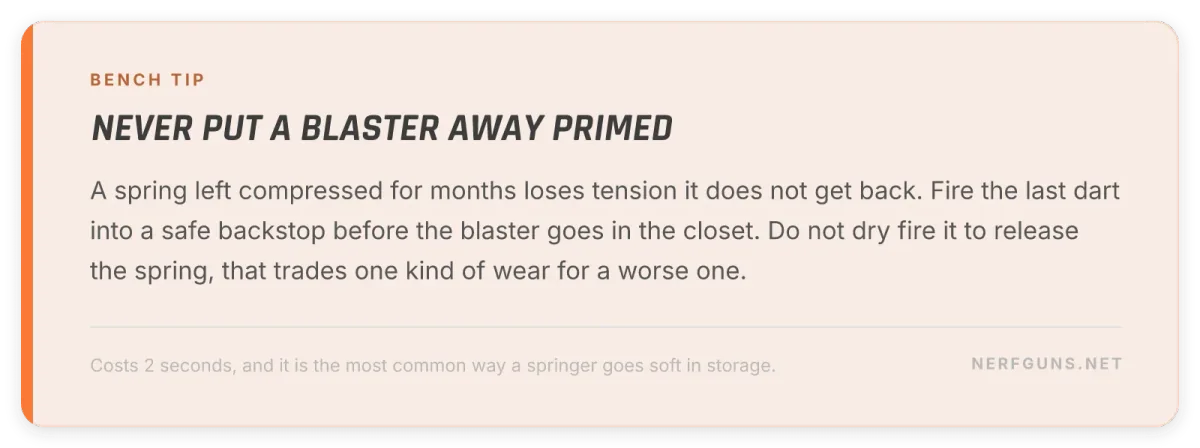
There is a trap in the second habit that catches people. The obvious way to release a primed spring is to pull the trigger on an empty chamber, which is dry firing. Fire the last dart into a safe backstop instead.
Pump and air blasters: seals and leaks
Nerf gun maintenance on an air blaster is almost entirely about seals. These blasters rarely snap. They leak, slowly, and the range drops so gradually that most people blame the darts.
The leak test. Pump the blaster to pressure with no dart loaded, then listen at the muzzle and along the shell seam in a quiet room. A leak you cannot see is usually one you can hear.
The old version of this article told you to hold the blaster underwater to find the bubbles. That works, and it is worth saying plainly what it costs you.
Water in a shell that has a spring, a screw or any electronics in it means rust and corrosion later. If you use the underwater test, use it only on a fully manual pump blaster, and strip and dry it completely afterwards.
Patch or replace, then grease the O-rings. Once the seal is good again, a thin film of silicone grease on every O-ring keeps it good. Dry rubber cracks.
Clean the pump shaft with a rag and the plunger recess with a cotton swab. Grit on a pump shaft grinds the seal it slides through, which is how a leak starts in the first place.
Flywheel blasters: motors and batteries
Motorised blasters have a maintenance list of their own, and almost none of it is about the motors.
Take the batteries out. Alkaline cells left in a blaster for a year leak, and the crust they leave on a battery tray contact is the end of that blaster unless you catch it early.
Check the tray every time you put a motorised blaster away for more than a month. That is 5 seconds of nerf gun maintenance against a dead contact you cannot solder back.
Keep the flywheel cage clean. Dart shavings and foam dust build up on the wheels and cost you velocity long before anything fails outright. A dry cotton swab clears it.
Never grease a flywheel. The wheels grip the dart by friction. Grease on the wheels is exactly the wrong thing, and it is the one place on a blaster where lubricant does harm.
If you have moved to a rechargeable pack, the care rules change completely and they are worth reading properly. We keep them in the LiPo safety and care checklist.
Which lubricant, and which one wrecks a blaster
This is the argument worth settling early, because getting it wrong does damage that grease cannot undo.
Use white lithium grease or a plastic safe silicone grease. Both are lubricants, both are safe on plastics and rubber, both stay where you put them, and both are in any hardware store.
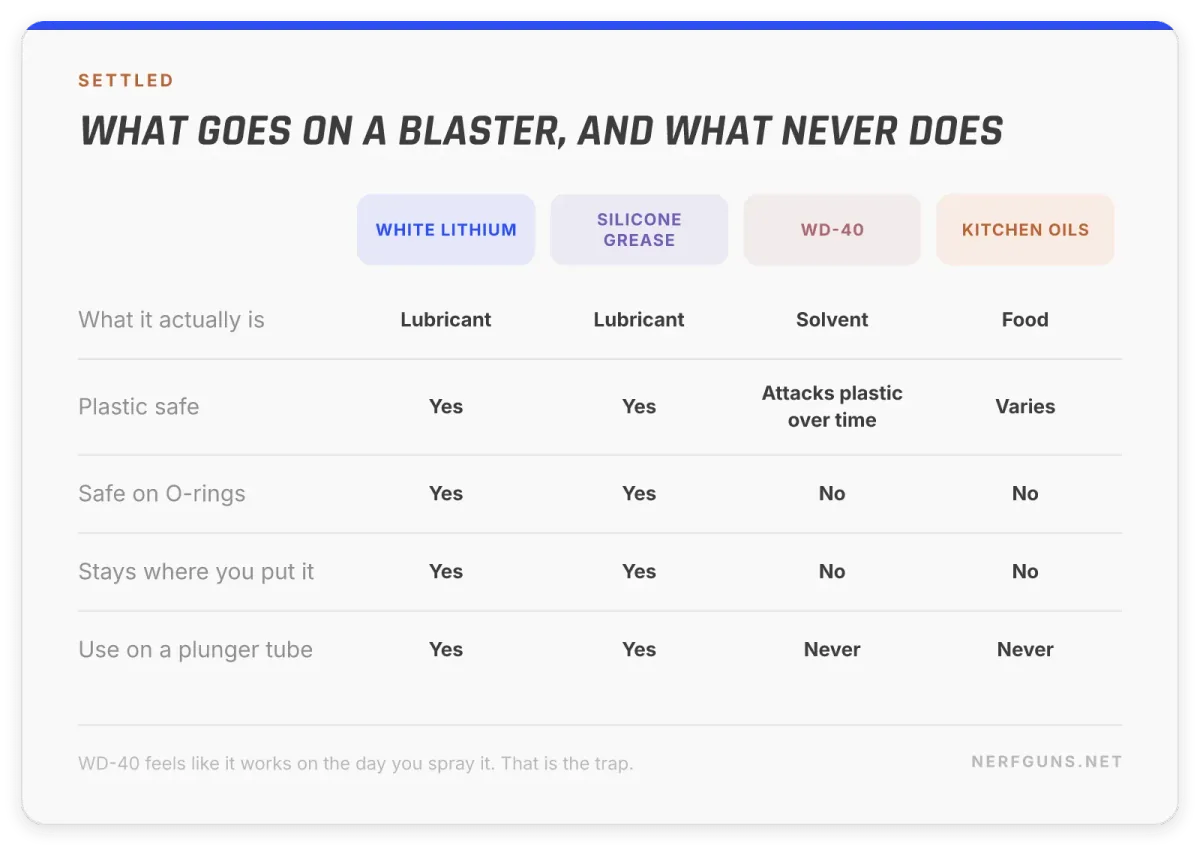
Never use WD-40. It is a solvent, not a lubricant. It attacks plastic over time, it degrades the O-rings an air blaster depends on, and it runs off the surface you sprayed it on.
It feels like it works on the day you spray it. That is the trap, and it is why the mistake keeps getting made.
Never use kitchen products. Vegetable oil and anything else edible goes rancid and grows bacteria inside a sealed shell. Petroleum jelly is not worth the gamble either, because whether it reacts depends on the plastics in your particular blaster.
Where the grease goes: the plunger tube, the rails, the pump shaft, the O-rings, and any surface that slides against another. A thin film, not a packed joint. More grease is not more nerf gun maintenance, it is just more grease to collect grit.
Dart care, because most jams start there
Most people who tell me their blaster is jamming have a dart problem, not a blaster problem.
A dart with a crushed tip or a bent body hangs up in a breech that a fresh dart clears every time. It is the cheapest fix in nerf gun maintenance and the one most often skipped.
- Sort after every war. Bent, split or flattened darts go in a separate bag, not back in the vest.
- Reshape rather than replace where you can. Our method is in how to reshape your old Nerf darts.
- Retire the ones with split foam. A split dart sheds inside the blaster and that debris ends up in the flywheel cage.
- Let wet darts dry fully before they go back in a mag. A damp dart swells slightly and that is enough to jam a tight breech.
Rotate your stock rather than retiring it in one go. Darts wear evenly if you use the whole pile, and unevenly if you keep reaching for the same 20.
The newer ammunition needs different habits
Everything above assumes a foam dart, and that is no longer the only thing people own. Two cases are worth 30 seconds of nerf gun maintenance thinking.
- N1 darts. The ammunition for Nerf’s N Series and Loadout blasters. Amazon’s own refill listing says they are compatible only with N Series blasters, so the usual trick of topping up from a communal tub does not work. Sort and store them separately from your Elite darts or you will spend a war handing back ammunition that does not fit anything you own.
- Gel rounds. Nerf’s Gelfire blasters do not fire foam at all, and the rounds are not reused. That takes them outside every habit on this page: there is no sorting, no reshaping and no rotating stock. Their storage and handling comes off the pack, not from a dart guide, and we are not going to invent care instructions for a consumable we have not tested.
The blaster half of the job does not change. Motors, seals, springs and grease behave the same whatever comes out of the front, so the rest of this nerf gun maintenance routine still applies.
Custom painted blasters: keeping the finish
A painted shell adds a nerf gun maintenance job the factory finish does not have, because paint is a layer that can be scratched off, faded or dissolved.
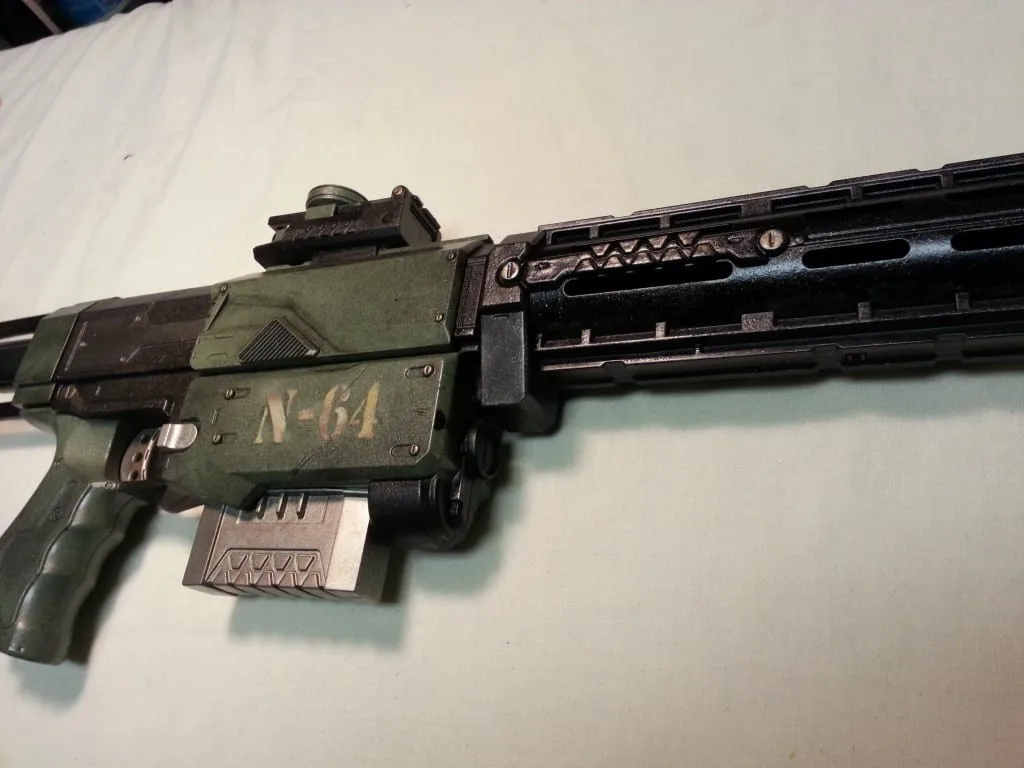
Seal it, and keep it sealed. A clear coat is what stands between your work and the world, and it matters most if you used acrylics for the detailing. Touch up dings and re-seal the area rather than leaving bare paint exposed.
Keep solvents away from it. Nail polish remover and paint thinner are built to strip paint and they do not care that yours was deliberate. Hand sanitiser will do it too.
Do not set it down hard on concrete, tables or tailgates. Scraping a painted shell against a rough surface is how most custom finishes actually die, not in a war.
Keep it out of the sun. The paint will not melt, but sunlight bleaches colour out of both paint and plastic, and a faded shell does not come back.
If you are planning a finish rather than protecting one, start with our guide to painting a Nerf gun and the surface prep method behind it.
Storage: putting a blaster away for months
Long term storage is where a collection quietly degrades, because nothing about it looks like damage while it is happening.
Run this list before anything goes in a closet or a bin for a season:
- Unload every dart and remove every magazine.
- Release the prime, by firing a dart rather than dry firing.
- Take the batteries out of anything motorised.
- Wipe the shell down and let it dry completely.
- Store it indoors, out of the sun, somewhere that does not swing 40 degrees.
An attic, a garage and a car boot are the 3 worst places to store a blaster. Heat cycling warps shells, and a warped shell never seals properly again.
That is the whole of long term nerf gun maintenance. Five lines, once, and the blaster comes out of storage the way it went in.
Can a Nerf blaster get wet?
A little water will not destroy a Nerf blaster, and this comes up often enough to answer directly.
Rain during a game is survivable. Foam darts soak it up and go heavy, your range drops, and the blaster itself is mostly fine if you dry it properly afterwards.
What causes the damage is water that stays. Water sitting on a spring, a screw, a battery contact or a motor is rust, and rust inside a sealed shell is not something you notice until it seizes.
The rule: wet is recoverable, stored wet is not. Strip what you can, dry it fully, then grease the metal parts before it goes back together. That one line is most of the nerf gun maintenance a rained-on blaster ever needs.
Super Soakers are the exception and are built for it, though even those want draining and drying before storage. Their history is in our Super Soakers guide.
What modding does to the bill
Every upgrade you add raises the maintenance bill, and that trade is worth knowing before you order a spring.
A stronger spring loads the plunger head, the catch and the shell harder on every single shot. Parts that would have lasted years at stock power start showing wear in months.
Move the 6 month inspection to 3 months on anything running an upgraded spring, and look at the catch face and the plunger head specifically. Those two take the load first.
Rewired flywheel blasters want a check of their own. Look at the solder joints and the heat shrink, because a joint that has been cycling hot is one of the few failures you can see coming.
None of this is an argument against modding. It means nerf gun maintenance stops being optional the moment a blaster leaves stock, and 20 minutes every 3 months is cheap next to a cracked plunger tube.
That is also why good nerf gun maintenance and good modding tend to show up in the same people. Both come down to opening the thing up and looking.
5 mistakes that cost people a blaster
These are the 5 I see over and over. Every one is free to avoid, and every one undoes months of good nerf gun maintenance in a single afternoon.
- Dry firing. Chips the plunger post, and faster with every spring upgrade you add.
- Spraying WD-40 into a blaster. It is a solvent. It gets the squeak out today and costs you the O-rings and the plastic later.
- Storing it primed. Months of compression takes tension out of a spring permanently.
- Leaving batteries in. A leaked alkaline cell ends a motorised blaster at the contacts.
- Leaving it in the sun or on a hot dashboard. Fades the colour, warps the shell, and both are permanent.
Modding raises the stakes on all 5, because every one of them punishes an upgraded spring harder than a stock one. The full picture is in our Nerf gun mods guide.
Gear for nerf gun maintenance
As an Amazon Associate I earn from qualifying purchases.
Nothing here is Nerf branded and nothing here is expensive. This is the shopping list behind every section above.
- White lithium grease on Amazon, for plunger tubes, rails and anything that slides.
- Plastic safe silicone grease, the better choice for O-rings on an air blaster.
- A precision screwdriver set with a genuine PH0 and PH1.
- Matte clear coat spray, for sealing and re-sealing a painted shell.
- Elite dart refills, so retiring a split dart never costs you a game.
Buy the screwdriver set once and the grease once. Both outlast the blasters you bought them for.
Bonus tip: this is the least exciting gift list in the world and the most useful. Silicone lubricant, a screwdriver that fits, spare O-rings. Nobody buys these for themselves and nobody guesses them either. Put them on a free Nerf wish list and let somebody else fund the boring half.
Frequently asked questions
How often should I do nerf gun maintenance?
Wipe down and unprime after every war, lubricate every 2 to 3 months, and open the shell for a proper clean and inspection every 6 months. A blaster you use twice a year needs the storage list and nothing else.
What is the best lubricant for a Nerf gun?
White lithium grease or a plastic safe silicone grease. Both are safe on the plastics and rubber in a blaster, both stay put, and both are stocked in any hardware store.
Why is WD-40 bad for a Nerf blaster?
Because it is a solvent rather than a lubricant. It degrades plastic and O-rings over time and it runs off the surface, so it fixes a squeak this week and costs you the seal later.
Is dry firing really that bad?
Yes, and it gets worse the more you mod. Without a dart to absorb the air, the plunger head hits the barrel post directly, which chips it over time and can crack it quickly on an upgraded spring.
Can Nerf guns get wet?
Briefly, yes. A rained-on blaster is usually fine if you strip it, dry it fully and re-grease the metal. Water left inside a shell is what causes the rust and corrosion that actually ends a blaster.
Should I take the batteries out of a motorised blaster?
Yes, any time it will sit for more than a month. Leaking alkaline cells corrode the tray contacts, and that is a repair most people cannot make.
Does a modded blaster need more maintenance?
It does, and it moves the whole nerf gun maintenance schedule up. A stronger spring puts more load on the plunger head, the catch and the shell every single shot, so inspection moves to every 3 months and dry firing hurts sooner.
How do I stop my blaster jamming?
Start with the darts. Sort out anything bent, split or crushed, let wet darts dry fully, and clear foam dust out of the breech and the flywheel cage before you go looking for a mechanical fault.
Does opening the shell void the warranty?
It does end any manufacturer warranty, so a blaster still inside its warranty window gets the outside-only routine. Everything that has been on the shelf longer than that is yours to open.
It’s Nerf or Nothin’!


hey I have a number of guns and after a while they began to loose some of their range. To correct this I very carefully took out the holding screws for the body half’s. A video of it coming apart is help full for re-assembly and if any parts fall away. I start by doing a quick clean with a Q tip to remove dirt particles from all moving parts, then when satisfied I used pure mineral oil on the piston “O” ring, use it sparingly. Next only 2 drops of oil in the piston barrel wall and spread it around. Another Q tip with one drop of oil on it was used to lubricate the “O” ring at the end of the pump barrel that rubs against the barrel/magazine that holds the darts, this helps to seal this gap a bit. Check the spring length and measure it, give it a little stretch, no more than 1 inch, be careful not to twist it out of shape. Re-assemble everything and load it. Point at something like an old towel and take enough shots to empty the magazine or barrel at least once and you should see a remarkable improvement with power and distance.
good luck and have fun
Thanks for sharing this, bob!